Installing a new cab
Moderator: FORDification
-
Trokita101
- New Member

- Posts: 45
- Joined: Thu Aug 15, 2013 2:17 am
Installing a new cab
Hi guys I'm so thrilled and excited about putting my bump back on the road. I don't want to sound like most TV shows that have a deadline to get a project done, however, I have exactly 3 weeks to get my interior and current cab strip to bare metal so I could put in place the new cab. I need help getting as much information as possible on how to remove most interior parts. I have spent the entire afternoon yesterday and removed the headliner, dome light, and beech seat. I found great information on how to remove the radio, so how do I remove the rest, the knobs, the steering wheel and column, etc.
You do not have the required permissions to view the files attached to this post.
-
sargentrs

- 100% FORDified!

- Posts: 9866
- Joined: Fri Jun 22, 2007 9:30 am
- Location: Georgia, Jasper
Re: Installing a new cab
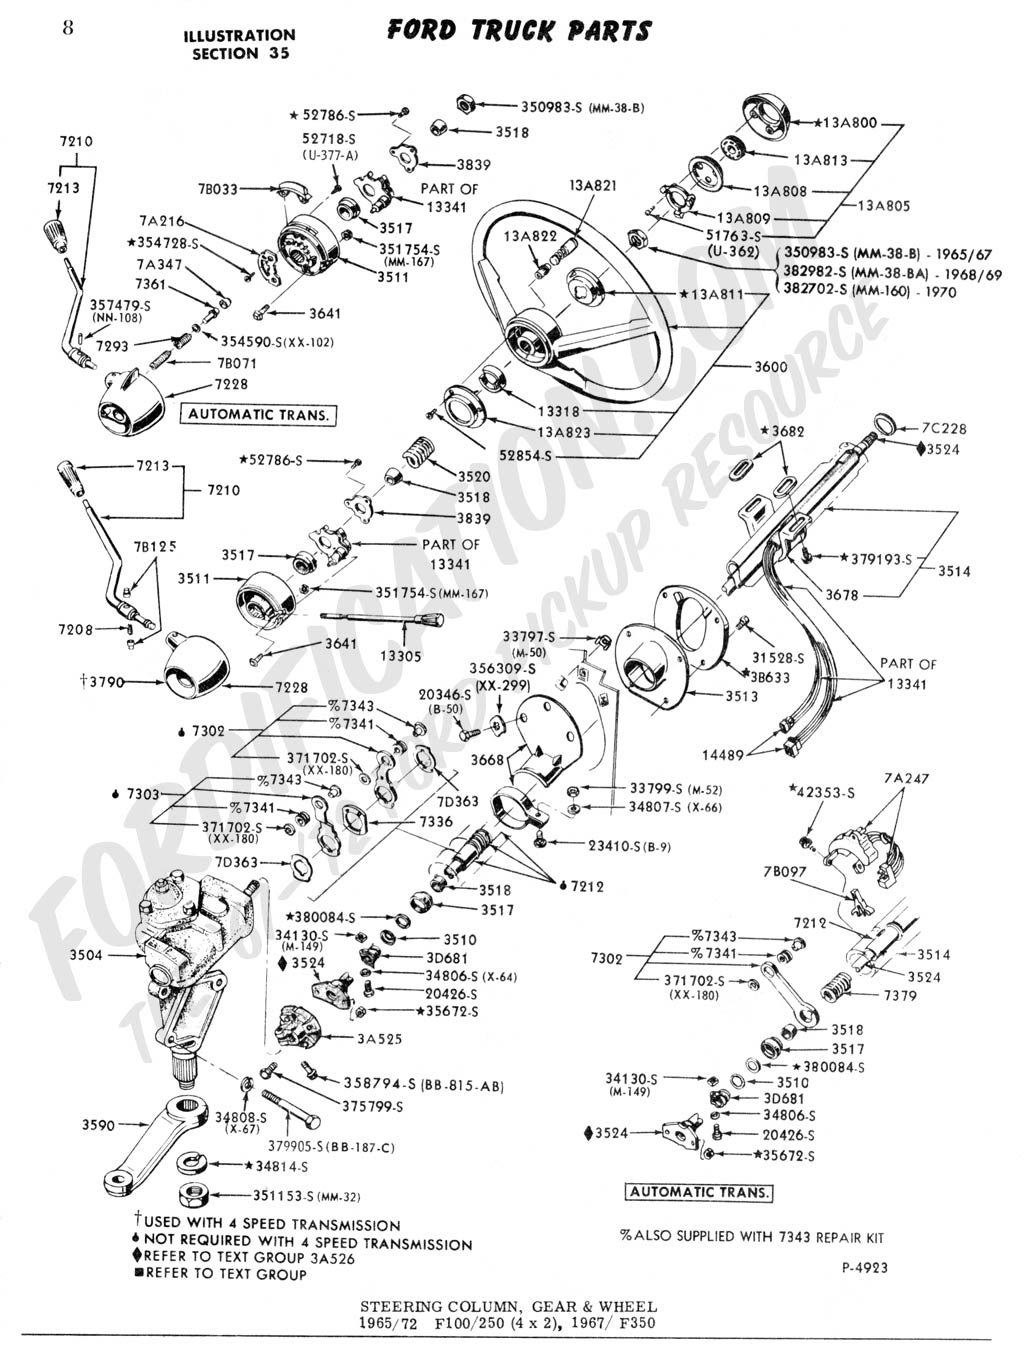
Steering column: Remove two nuts holding the bottom of the column to the rag joint. Remove clamp around bottom of column to firewall bracket. Disconnect shift linkage at levers on bottom of column. Remove firewall bracket inside engine compartment. Remove firewall bracket inside cab. Disconnect wiring harness. Remove bolts holding column to bottom of dash. Lay column down, pull to inside, turn column for levers to clear firewall and pull out. http://www.fordification.com/tech/image ... column.jpg
Headlight switch: Unplug wiring. Wiggle gently when pulling, they get brittle with age. On top of the switch, behind the dash, is a spring loaded button. Push the button down and pull the knob/shaft out. Twist off the nut, pull out from the back.
Other knobs usually have an allen head set screw holding the knob on and a bezel that screws on. Use a special tool or tap gently with a screwdriver/punch and hammer to get it started loose. Pull out from the back.
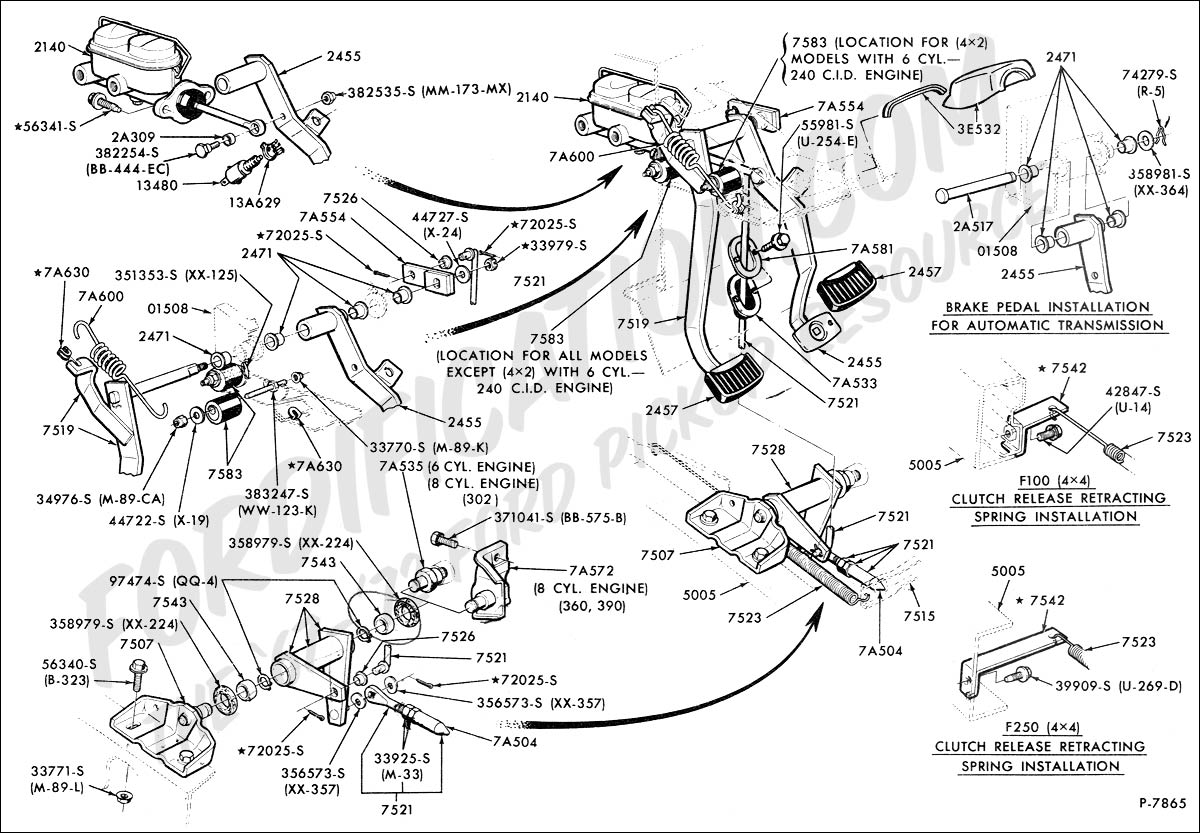
Brake/clutch pedals: Disconnect master cylinder rod at pedal. Disconnect brake light switch. Disconnect clutch linkage rod at pedal. Remove master cylinder inside engine compartment. Remove bolts on firewall (inside and outside). http://www.fordification.com/tech/image ... dals02.jpg
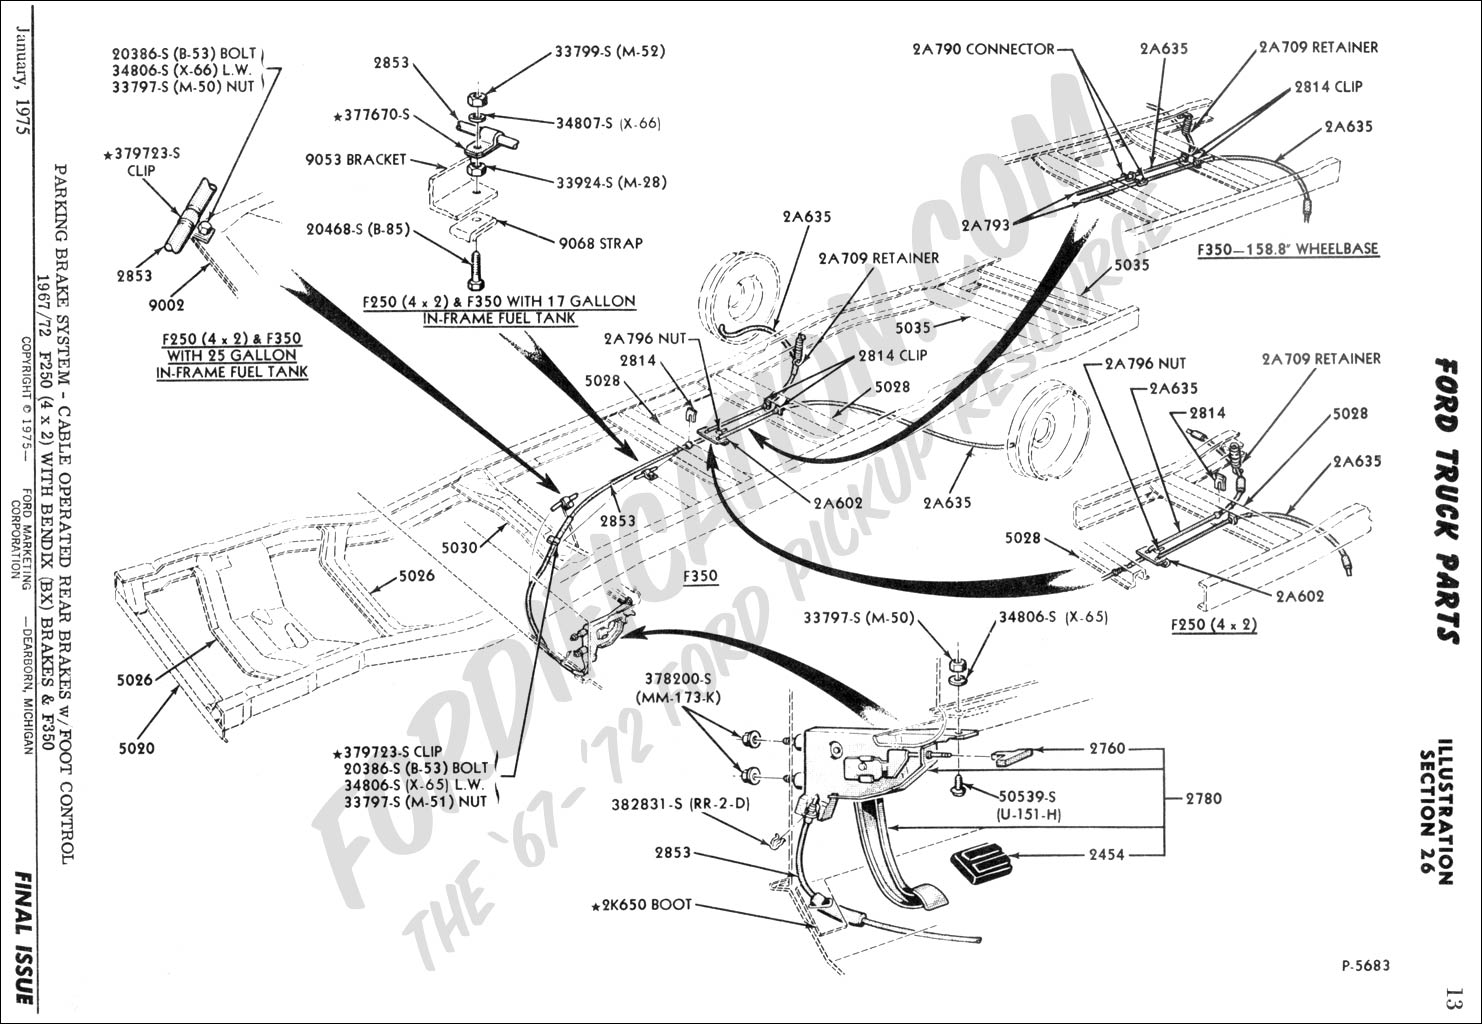
E-brake pedal: Remove hair pin holding cable on. Lift and pull cable end out of slot in lever. Remove bolts holding pedal assembly to under dash. Remove nuts inside engine compartment holding pedal assembly to firewall. http://www.fordification.com/tech/image ... rake03.jpg
Dash pad: Held in place by studs sticking from the underside of the dash pad, through the dash sheet metal, and held on with nuts on the under/back side of the dash. Here's a thread showing the holes where the studs go through the dash and other details http://www.fordification.com/forum/view ... ad+removal
I'm sure I've forgotten something on each of those but get all that out and let's see what's left. Check out my build thread, in my signature, for other pics and details. Post up if you get stuck.
Headlight switch: Unplug wiring. Wiggle gently when pulling, they get brittle with age. On top of the switch, behind the dash, is a spring loaded button. Push the button down and pull the knob/shaft out. Twist off the nut, pull out from the back.
Other knobs usually have an allen head set screw holding the knob on and a bezel that screws on. Use a special tool or tap gently with a screwdriver/punch and hammer to get it started loose. Pull out from the back.
Brake/clutch pedals: Disconnect master cylinder rod at pedal. Disconnect brake light switch. Disconnect clutch linkage rod at pedal. Remove master cylinder inside engine compartment. Remove bolts on firewall (inside and outside). http://www.fordification.com/tech/image ... dals02.jpg
E-brake pedal: Remove hair pin holding cable on. Lift and pull cable end out of slot in lever. Remove bolts holding pedal assembly to under dash. Remove nuts inside engine compartment holding pedal assembly to firewall. http://www.fordification.com/tech/image ... rake03.jpg
Dash pad: Held in place by studs sticking from the underside of the dash pad, through the dash sheet metal, and held on with nuts on the under/back side of the dash. Here's a thread showing the holes where the studs go through the dash and other details http://www.fordification.com/forum/view ... ad+removal
I'm sure I've forgotten something on each of those but get all that out and let's see what's left. Check out my build thread, in my signature, for other pics and details. Post up if you get stuck.
Randy
1970 F100 Sport Custom Limited LWB, 302cid, 3 on the tree. NO A/C, NO P/S, NO P/B. Currently in 1000 pcs while rebuilding. Project thread: http://www.fordification.com/forum/view ... 22&t=59995 Plan: 351w, C4, LSD, pwr front disc, p/s, a/c, bucket seats, new interior and paint.
1987 F-150 XLT Lariat, 5.0/C6 auto.
-
jamesingarage

- New Member
- Posts: 85
- Joined: Fri Nov 16, 2012 4:44 am
- Location: Blaine TN
Re: Installing a new cab
Dont forget ziplock bags & boxes (all sizes) and a sharpie, what i call bag and tag, all the small parts in the bags and tag it, i put larger stuff in the boxes, this makes it a lot more simple when you put things back together  !! half of my crew cab is in bags and boxes..
-
Randle

- New Member
- Posts: 221
- Joined: Mon Oct 25, 2004 7:21 pm
- Location: Western Kentucky
Re: Installing a new cab
The only other thing I would add to some already good advice is take plenty of pictures. One picture can save a lot of time when you start putting everything back together.
Last edited by Randle on Tue Jan 07, 2014 12:46 pm, edited 1 time in total.
-
Randle
- New Member
- Posts: 221
- Joined: Mon Oct 25, 2004 7:21 pm
- Location: Western Kentucky
Re: Installing a new cab
The only other thing I would add to some already good advice is take plenty of pictures. One picture can save a lot of time when you start putting everything back together.
-
Trokita101
- New Member
- Posts: 45
- Joined: Thu Aug 15, 2013 2:17 am
Re: Installing a new cab
I feel so good that there are members in this site that are willing to help  Thank you all for your suggestions as I am following every single one of them. Thank you guys for all your help. Last week was crazy at work and had a few hours to work on my bump. This is were I am sitting as of today.
The radio, and glove box are all in plastic bags, bench seat, headliner and anything else that is attached to the roof has been removed. I am having a bit of trouble removing the climate control unit I traced a wire that pulls out all the way to the engine bay. Any help will be much appreciated.
The radio, and glove box are all in plastic bags, bench seat, headliner and anything else that is attached to the roof has been removed. I am having a bit of trouble removing the climate control unit I traced a wire that pulls out all the way to the engine bay. Any help will be much appreciated.
-
Trokita101
- New Member
- Posts: 45
- Joined: Thu Aug 15, 2013 2:17 am
Re: Installing a new cab
This is a picture of the climate control unit, I have also included some other pictures thank you guys. On the process of unplugging the harness I ended up breaking a connection is there a fix to it.
You do not have the required permissions to view the files attached to this post.
-
Trokita101
- New Member
- Posts: 45
- Joined: Thu Aug 15, 2013 2:17 am
Re: Installing a new cab
I am also in some advice and maybe instructions on how to remove the 'mystery box' I really do not know the name of it.
You do not have the required permissions to view the files attached to this post.
-
tac
- Preferred User

- Posts: 443
- Joined: Mon Jun 03, 2013 10:50 am
- Location: Dallas/Ft. Worth
Re: Installing a new cab
Heater to the left and fresh air vent to the right. There are nuts in the engine compartment that hold the heater to the firewall and screws that attach the fresh air vent to the kick panel.