Robroy,
I'm enjoying another one of your great threads! I will be adding these seat belts to the top of my "to-do" list. They generally seem to meet with favorable reviews by the good people on this site.
It appears as though the shoulder belt holes are already threaded on my '68. I find it curious that #50's holes weren't already threaded? You did what looks to be a great job!
I've noticed a lot of talk about bolt grading - grade 5 vs grade 8 for example - and was curious as to a couple things;
1) Why would the manufacturer of those belts ship them with grade 5 (assuming grade 5 is inferior to grade 8 ) instead of grade 8? Price? There can't be that much difference? Is it your opinion that the extra strength of the grade 8 bolts is significant enough to "upgrade"?
2) How does one tell the difference between bolt grades?
On a related topic, your seat looks awesome! I want to keep my original seat, but the springs and foam are shot. The cover isn't too beat up. Where did you have the upholstery work done, and, if I may ask, what would one expect to pay for the quality of your seat?
Thanks as always!
~Bub
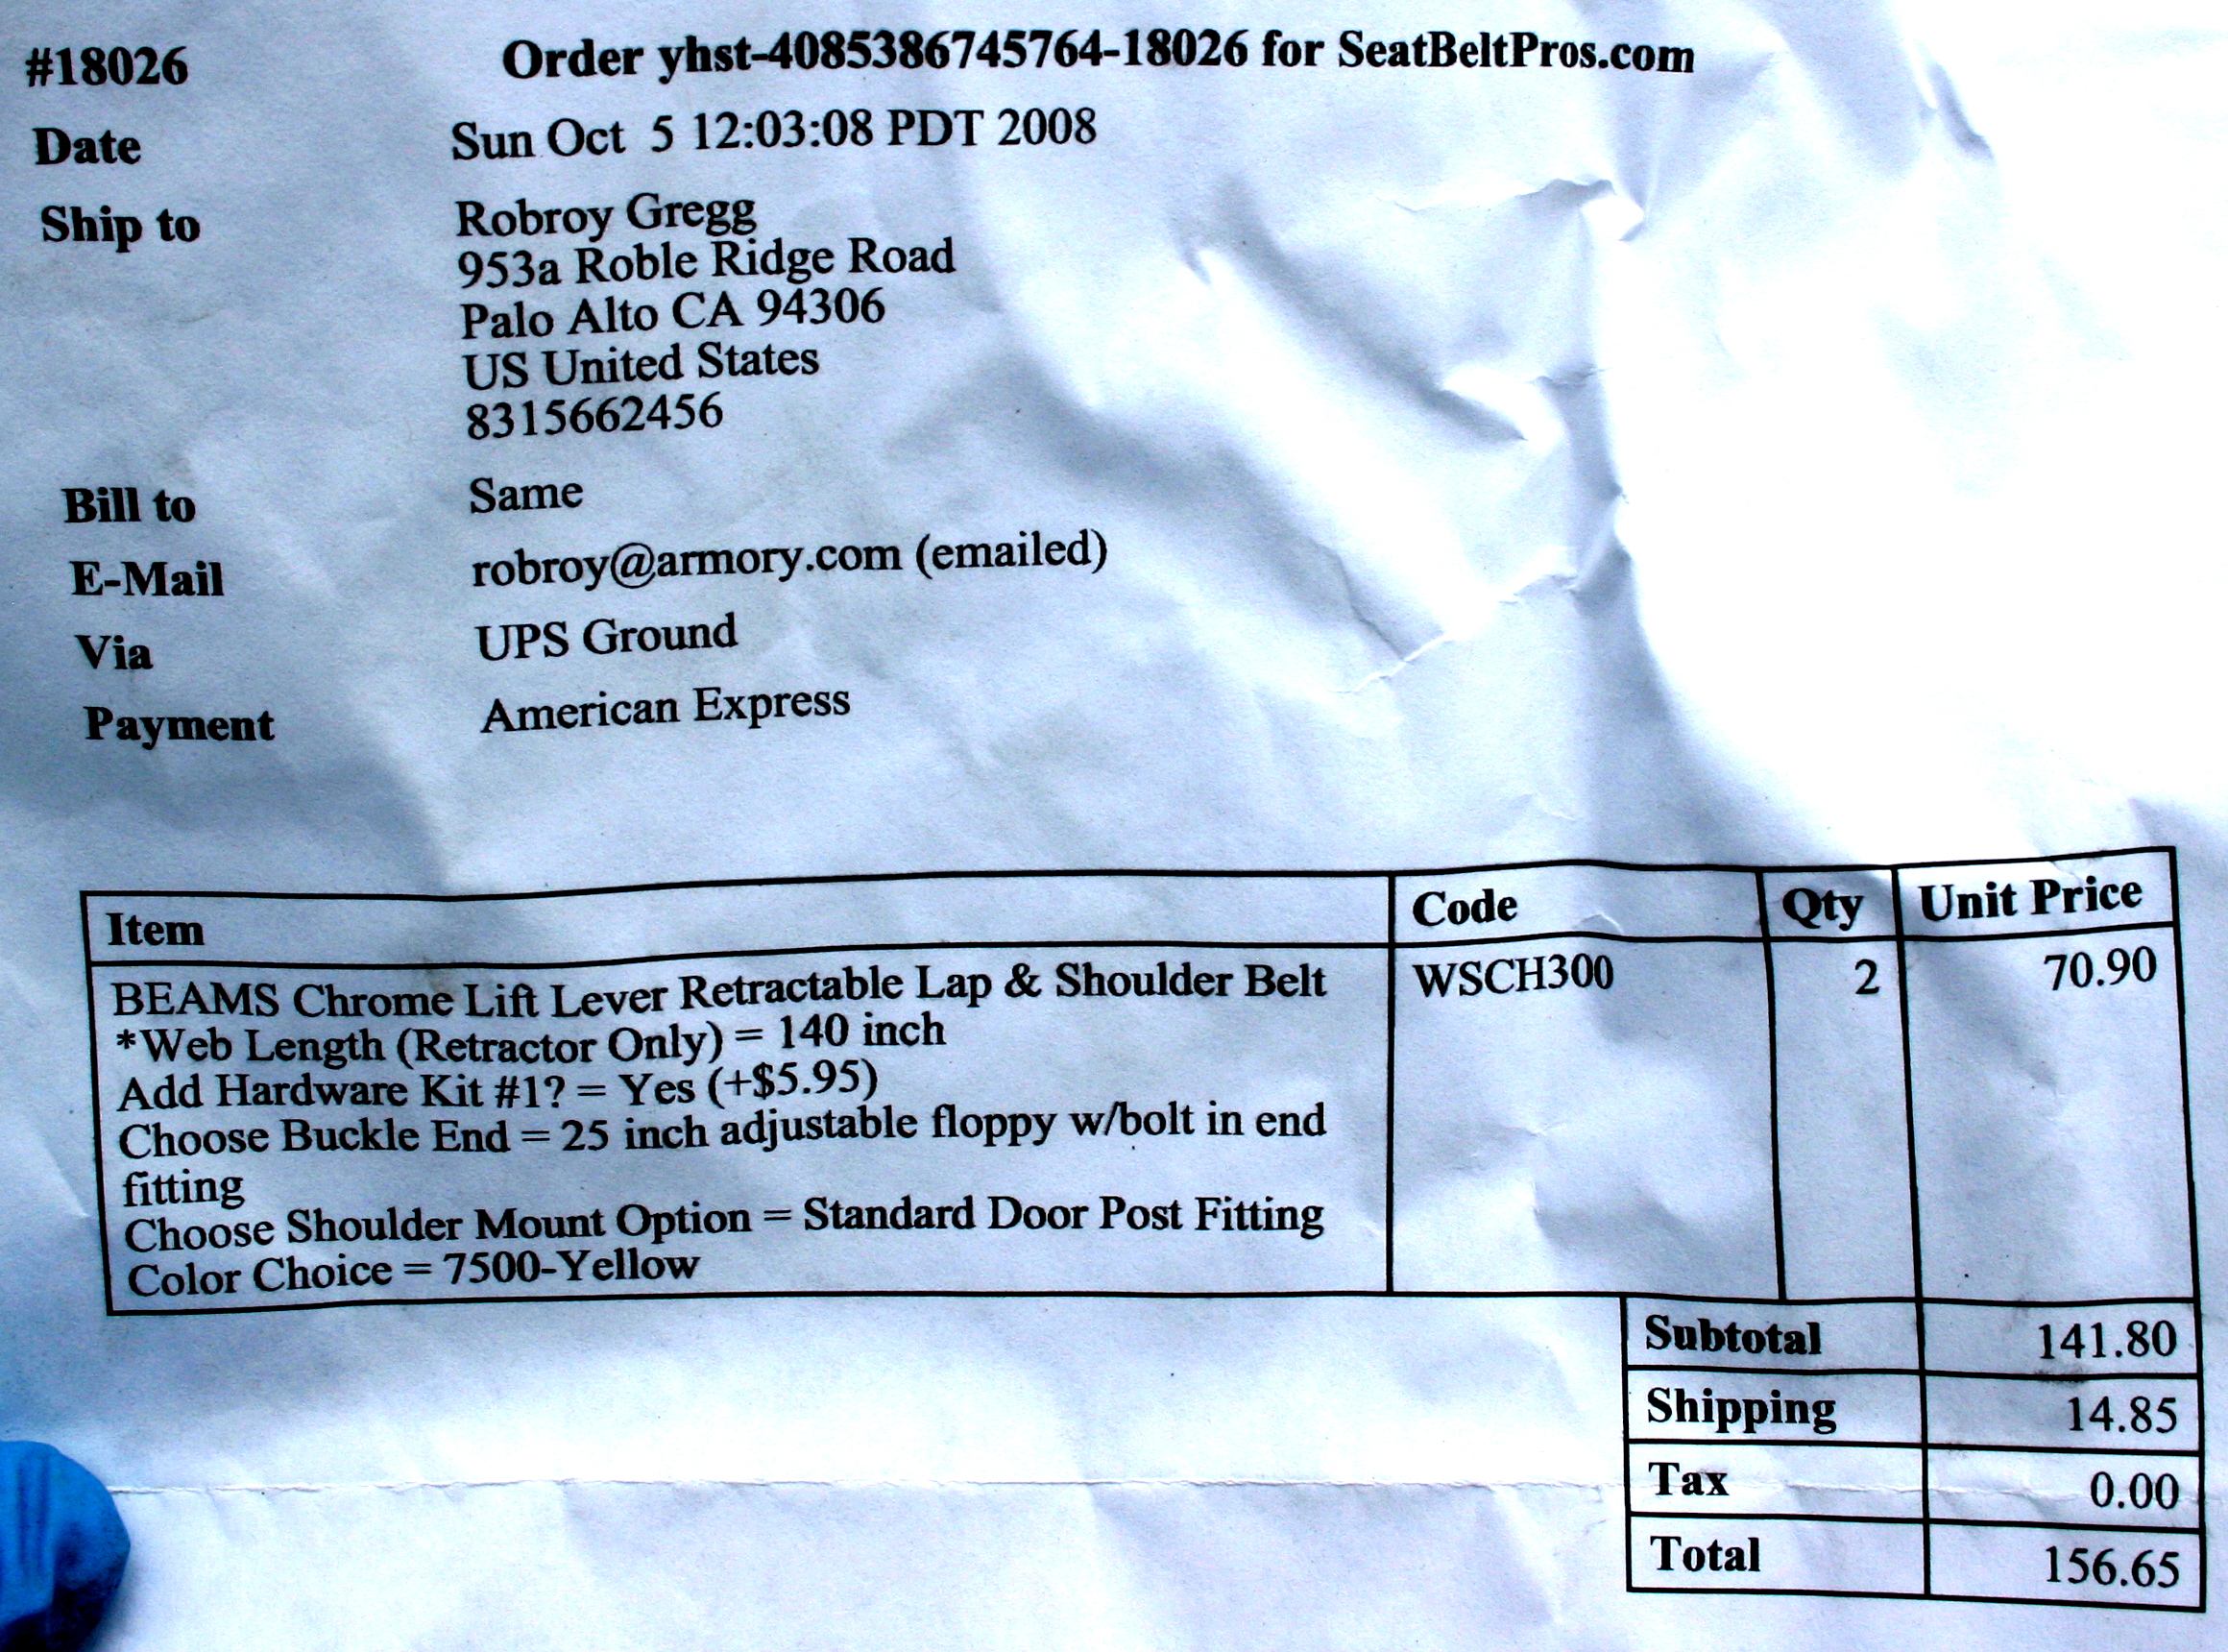
May I ask for advice on Beam's 140" WSCH300 seat belts?
Moderator: FORDification
-
Bub
- New Member

- Posts: 42
- Joined: Tue May 18, 2010 11:22 am
- Location: Mission Viejo, CA
Re: May I ask for advice on Beam's 140" WSCH300 seat beats?
'68 f100 lwb, ps, pb, automatic, no a/c, stock 390
-
70_F100

- Moderator

- Posts: 2999
- Joined: Mon Oct 22, 2007 11:23 am
- Location: North Carolina, Kernersville
Re: May I ask for advice on Beam's 140" WSCH300 seat beats?
Robroy, sorry to take so long to get back to you on this, but other life events have had to take priority. My son is getting married in a couple of weeks, so wedding planning is #1, along with a "honey-do" list from the better half. (Remember, "If Mama ain't happy, ain't NOBODY happy!!!) 
I pulled the caps off in my 70, and the holes were there and threaded to 3/8-24.
I also checked a 72 at the local Pull-A-Part, and found exactly the same thing.
I pulled out my 70 Shop Manual, and found the following (basically the same thing your 72 manual says):
-The original bolts for the upper belt mount are 3/8-24.
-If the original threads are damaged, drill the hole to 13/32" and tap with a 7/16-20 tap.
As I stated before, use spacers behind the belt anchor to space the anchor away from the sheet metal. You also need a large, thick flat washer under the head of the bolt to help distribulte the load in the event of an accident. Grade 5 is sufficient, but, knowing you, I'm sure you'll want the added "peace of mind" afforded by a Grade 8 bolt. Alternately, IMHO, the ultimate would be to find some seat belt anchor bolts similar to the ones used for the lap belts, with a shoulder so that the anchors can pivot. Those should be available without a lot of trouble, especially at a local pull-a-part.
Hope this helps!!!
I pulled the caps off in my 70, and the holes were there and threaded to 3/8-24.
I also checked a 72 at the local Pull-A-Part, and found exactly the same thing.
I pulled out my 70 Shop Manual, and found the following (basically the same thing your 72 manual says):
-The original bolts for the upper belt mount are 3/8-24.
-If the original threads are damaged, drill the hole to 13/32" and tap with a 7/16-20 tap.
As I stated before, use spacers behind the belt anchor to space the anchor away from the sheet metal. You also need a large, thick flat washer under the head of the bolt to help distribulte the load in the event of an accident. Grade 5 is sufficient, but, knowing you, I'm sure you'll want the added "peace of mind" afforded by a Grade 8 bolt.
Hope this helps!!!
Wise men talk because they have something to say; fools talk because they have to say something.--Plato
Why is it that there's seldom time to fix it right the first time, but there's always time to fix it right the second time???
That's not an oil leak That's SWEAT from all that HORSEPOWER!!
Why is it that there's seldom time to fix it right the first time, but there's always time to fix it right the second time???
That's not an oil leak
-
robroy

- 100% FORDified!

- Posts: 3768
- Joined: Sun Jul 06, 2008 4:36 pm
- Location: California, Salinas
Re: May I ask for advice on Beam's 140" WSCH300 seat beats?
Good day Speed Bump, Bub, and 70_F100, thanks for your superb replies!
And thanks for saying the job I did looks great, yet so far it's not good enough--the threads I tapped are too loose, so I need to jump to the next size and very carefully try again!
I found a blurb about this standard on the US Department of Transportation Web site; here it is:
I then asked Steve if he knew of any reason not to replace the grade five bolts with grade eight bolts. For example, perhaps the bolts are supposed to shear under a certain amount of stress, to save a person's rib cage from having to absorb all of it. I heard that there's nothing like that going on, and that there's no reason to avoid replacing them with grade eight bolts. Yet he stressed again that grade five bolts are more than strong enough!
Steve sounded unusually friendly and knowledgeable. I was really impressed with the way he responded to my question--Beam's seems like a quality place!
That said, I have more faith in the Steve's opinion, since all he does every day is design and produce custom seat belts!
Bolts with several lines on their heads are made especially strong for environments where they'll be under significant stress, and where a bolt failure would cause serious trouble, like so many critical bolts all over our trucks. There are a variety of line quantities, yet the two common styles you'll see are grade five (three lines) and grade eight (six lines). If I remember correctly, the off-by-two offset between the grade number and the number of lines is caused by "grade two" referring to bolts with no lines at all.
Another thing to consider is that a larger, lower grade bolt is often much stronger than a smaller, higher grade bolt. I've heard that bolts used in the construction of large structures (like bridges) aren't anywhere near as high-grade as grade eight bolts, yet they more than make up for that with their huge size. And of course in weight-sensitive environments you don't want huge, heavy bolts!
Here's an image I found that might interest you: Image of Bolt Heads for each Grade.
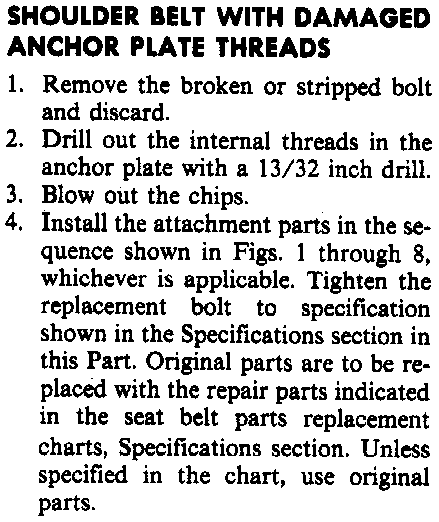
Here's what I see in the 1972 Ford Truck Shop Manual, page 41-50-5:
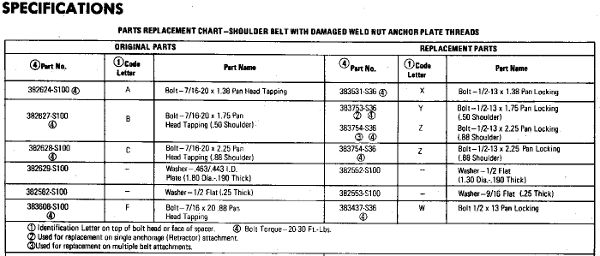
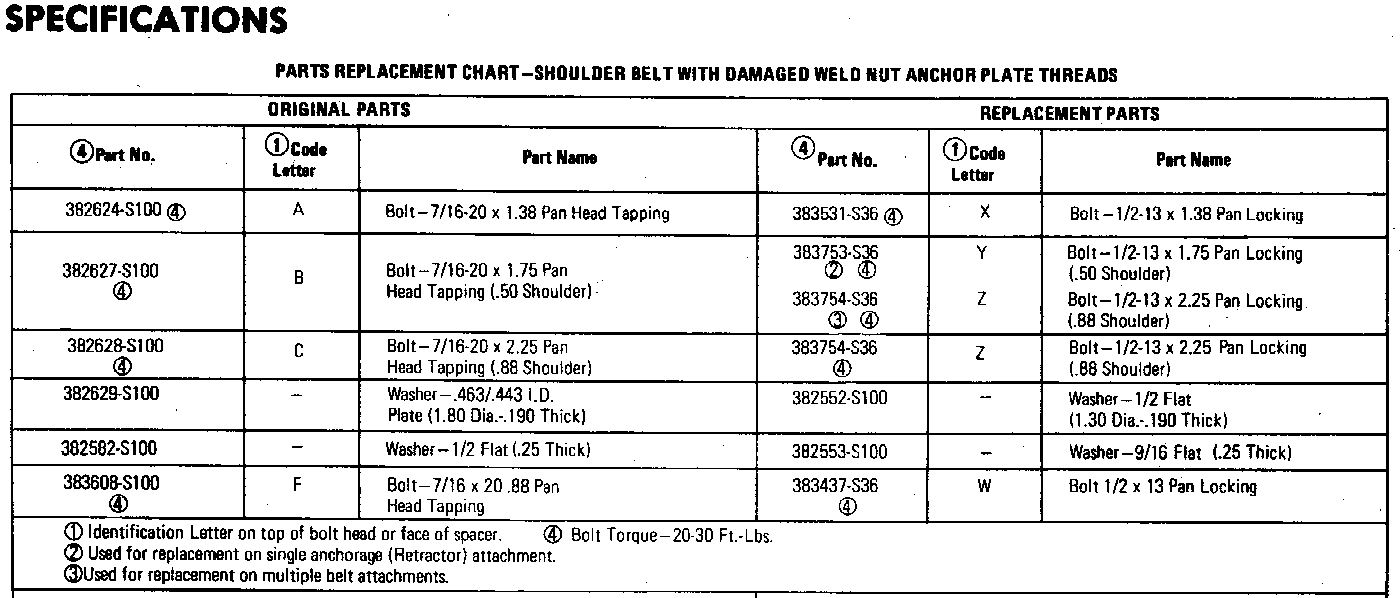
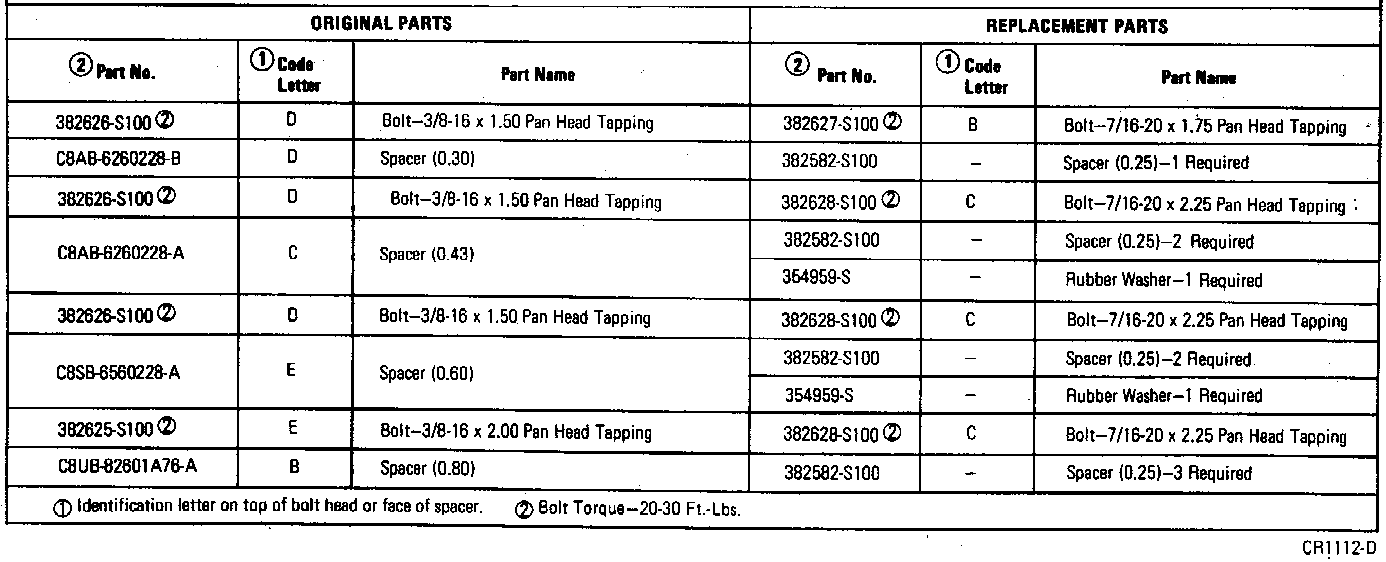
And here's the original and replacement should anchor hardware chart on page 41-50-6, in two parts. They probably won't be legible until they're clicked upon for the full-sized versions:

This Afternoon's Question:
Robroy
I see! That's interesting that you can still buy them. Perhaps I'll come up with the ideal bolt specification for my shoulder belts, then visit the local Ford parts department (or call Green Sales Company) to see if they have those OEM bolts in stock. I like the huge, round head on those OEM bolts!speed bump wrote:The torx head bolt and large washer I believe are OEM. Ford used them forever for seat belts and you can still buy them from Ford.
Okay! I don't fully understand the subtle pros and cons of using coarse thread versus fine thread for these bolts, yet since it seems that Ford used fine thread for the other seat belt bolts on my truck, that's what I'll aim to stick with (if possible).speed bump wrote:Personally I tapped the shoulder belt holes for 3/8 or 7/16 coarse thread (I can't remember which right now but i'm almost certain the head is a 5/8" which is either a small headed 7/16 or a normal 3/8") and it seem to be fine.
Thanks very much Bub! The quality of these belts seems high, and I have a strong hunch that they're USA-made. Have you already browsed through The Beam's Web site? Plus, I like all the crazy colors they come in.Bub wrote:I'm enjoying another one of your great threads! I will be adding these seat belts to the top of my "to-do" list. They generally seem to meet with favorable reviews by the good people on this site.
It sounds like most guys have trucks with those holes pre-threaded; that's convenient! Yet I've heard from one or two other members that their trucks required threading.Bub wrote:It appears as though the shoulder belt holes are already threaded on my '68. I find it curious that #50's holes weren't already threaded? You did what looks to be a great job!
And thanks for saying the job I did looks great, yet so far it's not good enough--the threads I tapped are too loose, so I need to jump to the next size and very carefully try again!
That's a great question! I could only guess at the answer, so I just called Beam's and spoke with Steve. I heard that grade five bolts are included in the kit because they meet the (F)ederal (M)otor (V)ehicle (S)afety (S)tandard #209, which specifies a minimum bolt grade of five.Bub wrote:I've noticed a lot of talk about bolt grading - grade 5 vs grade 8 for example - and was curious as to a couple things;
1) Why would the manufacturer of those belts ship them with grade 5 (assuming grade 5 is inferior to grade 8 ) instead of grade 8? Price? There can't be that much difference?
I found a blurb about this standard on the US Department of Transportation Web site; here it is:
I also heard from Steve that grade five bolts actually go far beyond the reasonable strength requirement for the types of shearing force you're likely to encounter in a collision.National Highway Traffic Safety Administration wrote: Standard No. 209 - Seat Belt Assemblies - Passenger Cars, Multipurpose Passenger Vehicles, Trucks, and Buses (Effective 3-1-67) This standard specifies requirements for seat belt assemblies. The requirements apply to straps, webbing, or similar material, as well as to all necessary buckles and other fasteners and all hardware designed for installing the assembly in a motor vehicle, and to the installation, usage, and maintenance instructions for the assembly
I then asked Steve if he knew of any reason not to replace the grade five bolts with grade eight bolts. For example, perhaps the bolts are supposed to shear under a certain amount of stress, to save a person's rib cage from having to absorb all of it. I heard that there's nothing like that going on, and that there's no reason to avoid replacing them with grade eight bolts. Yet he stressed again that grade five bolts are more than strong enough!
Steve sounded unusually friendly and knowledgeable. I was really impressed with the way he responded to my question--Beam's seems like a quality place!
My current opinion's that there's no important reason not to upgrade to grade eight bolts, as long as the dimensions of the bolts remain the same. Yet if there are OEM bolts with really nice, huge heads that are grade five, I'd choose those ahead and of the regular grade eight bolts.Bub wrote:Is it your opinion that the extra strength of the grade 8 bolts is significant enough to "upgrade"?
That said, I have more faith in the Steve's opinion, since all he does every day is design and produce custom seat belts!
If you look at the head of a bolt, you'll either see an unmarked smooth surface, or you'll see a number of lines arranged in a star-burst pattern, like rays of sunlight in a child's drawing. Unmarked bolts are sold for applications where they'll be under minimal stress, and where a bolt failure won't cause any serious trouble. Examples could be bolts used to build a gate around your yard, or bolts used to put a [censored] cabinet together.Bub wrote:2) How does one tell the difference between bolt grades?
Bolts with several lines on their heads are made especially strong for environments where they'll be under significant stress, and where a bolt failure would cause serious trouble, like so many critical bolts all over our trucks. There are a variety of line quantities, yet the two common styles you'll see are grade five (three lines) and grade eight (six lines). If I remember correctly, the off-by-two offset between the grade number and the number of lines is caused by "grade two" referring to bolts with no lines at all.
Another thing to consider is that a larger, lower grade bolt is often much stronger than a smaller, higher grade bolt. I've heard that bolts used in the construction of large structures (like bridges) aren't anywhere near as high-grade as grade eight bolts, yet they more than make up for that with their huge size. And of course in weight-sensitive environments you don't want huge, heavy bolts!
Here's an image I found that might interest you: Image of Bolt Heads for each Grade.
Thanks very much! I'm pleased with it. It's just what I was looking for!Bub wrote:On a related topic, your seat looks awesome!
The originals are certainly classic! Have you seen any photos of the neat bucket seats that came in our trucks? You might want to check those out before committing to having your bench seat re-done, just so you're aware of a couple of options.Bub wrote:I want to keep my original seat, but the springs and foam are shot. The cover isn't too beat up.
The seat was re-done at Palo Alto Upholstery for just shy of $1,000. Here's what they did to the seat:Bub wrote:Where did you have the upholstery work done, and, if I may ask, what would one expect to pay for the quality of your seat?
- Removed all of the bottom springs and tossed them.
- Made a custom support under the bottom to hold up a Dentside-era all-foam cushion.
- Put it together with all new foam and upholstery (naturally).
- Re-finished some of the metal seat frame pieces (they did an OK, so-so job on that part, yet I didn't do a good job of communicating my expectations with them).
Absolutely no problem 70_F100! I understand that you have a lot going on, and I'm certainly in no hurry here; thanks for taking the time to reply.70_F100 wrote:Robroy, sorry to take so long to get back to you on this, but other life events have had to take priority. My son is getting married in a couple of weeks, so wedding planning is #1, along with a "honey-do" list from the better half. (Remember, "If Mama ain't happy, ain't NOBODY happy!!!)
Fascinating!70_F100 wrote:I pulled the caps off in my 70, and the holes were there and threaded to 3/8-24.
I see. The sample size is increasing!70_F100 wrote:I also checked a 72 at the local Pull-A-Part, and found exactly the same thing.
Gosh, this makes me wish I'd been more patient and read through the manual before asking for help here! Thanks so much for looking this up, and you're right: I see very similar data in my 1972 manual.70_F100 wrote:I pulled out my 70 Shop Manual, and found the following (basically the same thing your 72 manual says):
-The original bolts for the upper belt mount are 3/8-24.
-If the original threads are damaged, drill the hole to 13/32" and tap with a 7/16-20 tap.
Here's what I see in the 1972 Ford Truck Shop Manual, page 41-50-5:
And here's the original and replacement should anchor hardware chart on page 41-50-6, in two parts. They probably won't be legible until they're clicked upon for the full-sized versions:
Understood 100%!70_F100 wrote:As I stated before, use spacers behind the belt anchor to space the anchor away from the sheet metal.
That's an excellent idea! I'll check with the local Ford dealer and/or Green Sales Company to see if they have any of the OEM bolts, spacers, and washers in stock. Maybe I can put the anchor area together using the special OEM parts that Ford used!70_F100 wrote:You also need a large, thick flat washer under the head of the bolt to help distribulte the load in the event of an accident. Grade 5 is sufficient, but, knowing you, I'm sure you'll want the added "peace of mind" afforded by a Grade 8 bolt.
It helps tremendously! Thanks so much 70_F100.70_F100 wrote:Hope this helps!!!
This Afternoon's Question:
- The 1972 Ford Truck Shop Manual says to drill damaged anchor inserts with a 13/32" bit. Yet the 13/32" drill bit doesn't seem to be a good match to any thread size shown in the Widell Industries chart.
As y'all know, 13/32" is about 0.4063", which may be too small for a 1/2-13 bolt yet too large for good thread engagement on a 7/16-20 bolt. The Widell chart jumps from a 0.3970" (X) bit for 55% engagement in 7/16-20 threads to a 0.4219" (27/64") bit size for a 1/2-13 bolt.
Shall I drill with a 13/32" bit and tap with 7/16-20 threads despite this?
Robroy
Last edited by robroy on Tue Jun 08, 2010 5:11 pm, edited 2 times in total.
-
70_F100
- Moderator
- Posts: 2999
- Joined: Mon Oct 22, 2007 11:23 am
- Location: North Carolina, Kernersville
Re: May I ask for advice on Beam's 140" WSCH300 seat beats?
Robroy, I'll try to answer a couple of your questions:
They also have less of a tendency to loosen on their own.
http://www.physics.ncsu.edu/pearl/Tap_Drill_Chart.html
My take on it is that different materials require a different thread engagement, and the 13/32” drill provides the proper thread engagement for steel. Apparently, either a 25/64” or a “Z” letter drill is acceptable, with 13/32” being the median acceptable size.
With that being said, you might want to try it out on another piece of metal of approximately the same thickness. You may find that the fit of the 3/8” bolt is acceptable.
Ultimately, though, the 7/16-20 bolts will provide better holding power, even if the fit is similar. Keep in mind, though, that the limiting factor will be the thickness of the metal.
Again, I hope this helps!!!
Richard
A fine thread bolt of a given diameter has more holding strength than a coarse thread bolt of the same diameter. If you look at torque specifications, you'll see that, generally, fine thread bolts are installed tighter than coarse thread bolts.robroy wrote: Okay! I don't fully understand the subtle pros and cons of using coarse thread versus fine thread for these bolts, yet since it seems that Ford used fine thread for the other seat belt bolts on my truck, that's what I'll aim to stick with (if possible).
Robroy
They also have less of a tendency to loosen on their own.
I think this chart from the Physics Department at NCSU (one of the country’s premier engineering schools) should fully answer your question:robroy wrote:
This Afternoon's Question:Robroy
- The 1972 Ford Truck Shop Manual says to drill damaged anchor inserts with a 13/32" bit. Yet the 13/32" drill bit doesn't seem to be a good match to any thread size shown in the Widell Industries chart.
As y'all know, 13/32" is about 0.4063", which may be too small for a 1/2-13 bolt yet too large for good thread engagement on a 7/16-20 bolt. The Widell chart jumps from a 0.3970" (X) bit for 55% engagement in 7/16-20 threads to a 0.4219" (27/64") bit size for a 1/2-13 bolt.
Shall I drill with a 13/32" bit and tap with 7/16-20 threads despite this?
http://www.physics.ncsu.edu/pearl/Tap_Drill_Chart.html
My take on it is that different materials require a different thread engagement, and the 13/32” drill provides the proper thread engagement for steel. Apparently, either a 25/64” or a “Z” letter drill is acceptable, with 13/32” being the median acceptable size.
With that being said, you might want to try it out on another piece of metal of approximately the same thickness. You may find that the fit of the 3/8” bolt is acceptable.
Ultimately, though, the 7/16-20 bolts will provide better holding power, even if the fit is similar. Keep in mind, though, that the limiting factor will be the thickness of the metal.
Again, I hope this helps!!!
Richard
Wise men talk because they have something to say; fools talk because they have to say something.--Plato
Why is it that there's seldom time to fix it right the first time, but there's always time to fix it right the second time???
That's not an oil leak That's SWEAT from all that HORSEPOWER!!
Why is it that there's seldom time to fix it right the first time, but there's always time to fix it right the second time???
That's not an oil leak
-
Calfdemon

- 100% FORDified!
- Posts: 2672
- Joined: Tue May 25, 2010 11:31 pm
- Location: California, Santa Clarita
Re: May I ask for advice on Beam's 140" WSCH300 seat beats?
Hey RobRoy,
I truly enjoy your threads as I tend to be following your lead on a lot of projects and am also working on a 72. The amount of detail you put into your progress threads is great and a real help to anyone attempting to do the same projects.
Shoulder belts are another project on my "to-do" list and are actually pretty high as it is a safety project and I currently am driving my truck. Thanks for pointing me in the direction of these seatbelts and the website that sells them. I will be purchasing them from seatbelt pros as well. I see that you went with the latch belts while I think I will be going with the Starburst ones.
My question is this, can you show how you mounted the retractor and any advice you have for that location? Did you get the extended shoulder mount or the regular? Did you buy the standard 140" retractor belt length? Obviously we needed 20 inch floppy buckles and not the shorter molded ones, so that part is obvious. I just want to make sure I order my belts correctly the first time. I will also probably be ordering a center lap belt as well so that it matches as i do drive 3 in my cab from time to time. Anyway, this is the shoulder belt i will probalby be ordering (in Dark Green or Military Green, still deciding). Just want to make sure I have it right.
http://www.gotbelts.com/strelapsh.html
Thanks again for your updates on this topic so far and providing everyone with pretty much a "how-to" topic with a good quality product that you recommend.
-Rich
**EDIT: Just noticed that they have installation photos on their website and there are photos of a 70 F100 which will be the same. They have both the retractor and shoulder mount (which appears to be in a different location than ours) photographed as part of it. Seems to have answered a couple of my questions, but still would like your thoughts and experiences. Also, now I am thinking of getting the latch belts as well..
**2nd EDIT: And upon further research, I see that they changed the hole location in mid 71, so that would explain the different shoulder mount location. I also found some additional photos of other people's installs on this site.
**3rd EDIT: And after coming home from work and looking at my shoulder mounting holes, how is this for strange? My passenger side hole is threaded, while my drivers side isnt. And this truck is (was) pretty much all original and stock when I got it. Both holes were plugged with some VERY old rubber. Took the rubber out and that is what I found. Someone asleep on the assembly line??
-Rich
Current toys -
69 Ford F350 Crew Cab - 460 / C6 - http://i253.photobucket.com/albums/hh67 ... lqgskp.jpg
31 Ford Vicky - 1955 270 Red Ram Hemi / 4 speed - http://i253.photobucket.com/albums/hh67 ... bsibvn.jpg
Former toys -
67 Pontiac Firebird 400 convertible (sold 9/13) - http://i253.photobucket.com/albums/hh67 ... bird-1.jpg
67 Ford Fairlane GT - 390 / 4 speed (sold 7/15) - http://i253.photobucket.com/albums/hh67 ... c5hu8z.jpg
-
robroy
- 100% FORDified!
- Posts: 3768
- Joined: Sun Jul 06, 2008 4:36 pm
- Location: California, Salinas
Re: May I ask for advice on Beam's 140" WSCH300 seat beats?
Good afternoon 70_F100 and Rich, thanks for your superb replies!
Given that fine threads have more holding strength, are coarse threads still used because they're less sensitive to debris getting jammed in the threads? Or because coarse-thread fasteners are less expensive to produce? Or perhaps because coarse-thread fasteners go together and come apart more quickly?
Rich, I'll be quite curious to hear whether the threaded insert's set up for 3/8-24, 7/16-20, or a yet undiscovered variety of threads!
70_F100 and Rich, thanks for your top quality replies!
Robroy
I see! Thanks for explaining that.70_F100 wrote:A fine thread bolt of a given diameter has more holding strength than a coarse thread bolt of the same diameter. If you look at torque specifications, you'll see that, generally, fine thread bolts are installed tighter than coarse thread bolts.robroy wrote: Okay! I don't fully understand the subtle pros and cons of using coarse thread versus fine thread for these bolts
They also have less of a tendency to loosen on their own.
Given that fine threads have more holding strength, are coarse threads still used because they're less sensitive to debris getting jammed in the threads? Or because coarse-thread fasteners are less expensive to produce? Or perhaps because coarse-thread fasteners go together and come apart more quickly?
Gosh, that chart is a real gem! Thanks so much for finding it and posting it here--it's fascinating.70_F100 wrote:I think this chart from the Physics Department at NCSU (one of the country’s premier engineering schools) should fully answer your question:robroy wrote:The 1972 Ford Truck Shop Manual says to drill damaged anchor inserts with a 13/32" bit. Yet the 13/32" drill bit doesn't seem to be a good match to any thread size shown in the Widell Industries chart.
http://www.physics.ncsu.edu/pearl/Tap_Drill_Chart.html
Understood!70_F100 wrote:My take on it is that different materials require a different thread engagement, and the 13/32” drill provides the proper thread engagement for steel. Apparently, either a 25/64” or a “Z” letter drill is acceptable, with 13/32” being the median acceptable size.
I see what you mean. I think that would be of great educational value to me, in addition to providing direction on my dilemma!70_F100 wrote:With that being said, you might want to try it out on another piece of metal of approximately the same thickness. You may find that the fit of the 3/8” bolt is acceptable.
Understood! I suppose that since Ford seems to be saying that it's OK to drill and tap the inserts for 7/16-20 threads, the thickness of the insert walls and surrounding metal area may not be a major concern. At least as long as 7/16-20 threads aren't exceeded by anything larger.70_F100 wrote:Ultimately, though, the 7/16-20 bolts will provide better holding power, even if the fit is similar. Keep in mind, though, that the limiting factor will be the thickness of the metal.
It's of marvelous help 70_F100! Thanks so much.70_F100 wrote:Again, I hope this helps!!!
Thanks for saying so Rich, yet outside of the photos, I believe the true credit belongs to my generous advisers.Calfdemon wrote:I truly enjoy your threads as I tend to be following your lead on a lot of projects and am also working on a 72. The amount of detail you put into your progress threads is great and a real help to anyone attempting to do the same projects.
Excellent! I agree with your priorities. It makes sense to give a lot of attention to brakes and seat belts!Calfdemon wrote:Shoulder belts are another project on my "to-do" list and are actually pretty high as it is a safety project and I currently am driving my truck.
You're most abundantly welcome! I went with the latches because of their all-metal design and old fashioned looks, although both styles are nice!Calfdemon wrote:Thanks for pointing me in the direction of these seatbelts and the website that sells them. I will be purchasing them from seatbelt pros as well. I see that you went with the latch belts while I think I will be going with the Starburst ones.
I'll be sure to do this! Several weeks ago I suspended my work on the seat belts while awaiting some guidance (that 70_F100 went Above and Beyond to provide). So although the guidance I'd been waiting for was generously supplied a while back, I haven't returned to this yet. When I do, I'll be sure to pay extra attention to the retractor mounting details and locations!Calfdemon wrote:My question is this, can you show how you mounted the retractor and any advice you have for that location?
This I don't remember, yet according to my invoice, my shoulder mount option was "Standard Door Post Fitting." That said, the wisdom of my choice, or the lack thereof, is not yet clear. One of the other options may have been better--I don't remember what the options were.Calfdemon wrote:Did you get the extended shoulder mount or the regular?
Indeed! Since I don't have the belts fully installed yet, I haven't been able to evaluate the wisdom of that choice yet, either.Calfdemon wrote:Did you buy the standard 140" retractor belt length?
That makes sense to me! According to my invoice I chose the option entitled, "25 inch adjustable floppy w/bolt in end fitting."Calfdemon wrote:Obviously we needed 20 inch floppy buckles and not the shorter molded ones, so that part is obvious.
I can relate! I can remember wondering about all the different choices when ordering mine as well. If you're not in any kind of hurry, I'll happily supply my complete review of the applicability of the options I selected once my setup's complete!Calfdemon wrote:I just want to make sure I order my belts correctly the first time.
Great idea! I'll be doing this same thing. Thinking back, I can't remember why I didn't include a center lap belt in with my initial order. Perhaps I wanted to "keep it simple" in the beginning, knowing that it would be a while before I'd want three folks to ride up front.Calfdemon wrote:I will also probably be ordering a center lap belt as well so that it matches as i do drive 3 in my cab from time to time.
Those sound like good choices! Did you know that for only a few bucks, they'll mail you small samples of whichever belt colors you're interested in? I received samples of 4005-Powder Blue, 6009-Charcoal, and 7500-Yellow before choosing the yellow. And I actually took the sample along with me to the upholstery shop to see if they could do the bench seat up to match it!Calfdemon wrote:Anyway, this is the shoulder belt i will probalby be ordering (in Dark Green or Military Green, still deciding). Just want to make sure I have it right.
You're very welcome! I'm happy to hear that it's proving useful.Calfdemon wrote:Thanks again for your updates on this topic so far and providing everyone with pretty much a "how-to" topic with a good quality product that you recommend.
Gosh, I never noticed that! I'll have to check that out.Calfdemon wrote:**EDIT: Just noticed that they have installation photos on their website and there are photos of a 70 F100 which will be the same.
Perfect! I'll have to check out those photos for sure! And with regard to the latch belts, I think they do seem to fit in with our trucks a little better.Calfdemon wrote:They have both the retractor and shoulder mount (which appears to be in a different location than ours) photographed as part of it. Seems to have answered a couple of my questions, but still would like your thoughts and experiences. Also, now I am thinking of getting the latch belts as well..
Indeed! They wanted to keep things exciting for us by making changes like that.Calfdemon wrote:**2nd EDIT: And upon further research, I see that they changed the hole location in mid 71, so that would explain the different shoulder mount location. I also found some additional photos of other people's installs on this site.
That is an excellent oddity!!! Maybe they figured you'd want to protect your wife, while it's less important for the man at the driver's wheel--he has the wheel to hang on to, and he can take it.Calfdemon wrote:**3rd EDIT: And after coming home from work and looking at my shoulder mounting holes, how is this for strange? My passenger side hole is threaded, while my drivers side isnt. And this truck is (was) pretty much all original and stock when I got it. Both holes were plugged with some VERY old rubber. Took the rubber out and that is what I found. Someone asleep on the assembly line??
Rich, I'll be quite curious to hear whether the threaded insert's set up for 3/8-24, 7/16-20, or a yet undiscovered variety of threads!
70_F100 and Rich, thanks for your top quality replies!
Robroy
-
Calfdemon
- 100% FORDified!
- Posts: 2672
- Joined: Tue May 25, 2010 11:31 pm
- Location: California, Santa Clarita
Re: May I ask for advice on Beam's 140" WSCH300 seat beats?
Well, I went to the hardware store today and picked up a couple of 3/8-24 bolts thinking that my passenger side would have been threaded to that bolt as everyone else's seems to be. I guess somewhere in the past 38 years, someone threaded that hole themselves and it was not stock, because the 3/8-24 did not fit. Just looking at it, it looks like it might be a 3/8 hole, but it appears to be course threaded and not fine thread. I will pick up a 3/8-16 in the next few days and see if that will thread in there.
Now I wonder what I should do, should I rethread the hole or should I just use whatever bolt fits the threads?
Oh, and thanks for pointing out the swatches on the website RobRoy, I had already ordered 3 and have them coming.. Going to check out the 3 different greens they have and see what works best with my interior.
-Rich
-Rich
Current toys -
69 Ford F350 Crew Cab - 460 / C6 - http://i253.photobucket.com/albums/hh67 ... lqgskp.jpg
31 Ford Vicky - 1955 270 Red Ram Hemi / 4 speed - http://i253.photobucket.com/albums/hh67 ... bsibvn.jpg
Former toys -
67 Pontiac Firebird 400 convertible (sold 9/13) - http://i253.photobucket.com/albums/hh67 ... bird-1.jpg
67 Ford Fairlane GT - 390 / 4 speed (sold 7/15) - http://i253.photobucket.com/albums/hh67 ... c5hu8z.jpg
-
Calfdemon
- 100% FORDified!
- Posts: 2672
- Joined: Tue May 25, 2010 11:31 pm
- Location: California, Santa Clarita
Re: May I ask for advice on Beam's 140" WSCH300 seat beats?
Well, I verified it an my passenger side is threaded to 3/8-16. So now my question is am I safe to mount my seatbelts with that threading using grade 8 bolts? Or should I re-thread it to a finer thread?
If that threading would be safe, then I will just tap the drivers side to 3/8-16 also. But I dont want to do that if it could cause a significant problem in an accident. I just dont know enough about threading and bolt strength to make this decision on my own. From what I have read here, the grade 8 bolts are the way to go, but I still am fuzzy on the threading. I read above where finer threads have better holding power and are less likely to loosen on their own. What if I was to apply a good amount of loctite with the bolts? That would prevent them from loosening on their own. The question still remains as to whether the course threading would be safe or unsafe. If the fine threading is just safer, but he course is still safe, then I would prefer to leave the hole alone and not rethread it as if I have to drill it bigger and re-tap it, I would think that the drilling it bigger would weaken the anchor location and I might not be better off than the course threading at a smaller diameter.
Thanks in advance for any input..
-Rich
Current toys -
69 Ford F350 Crew Cab - 460 / C6 - http://i253.photobucket.com/albums/hh67 ... lqgskp.jpg
31 Ford Vicky - 1955 270 Red Ram Hemi / 4 speed - http://i253.photobucket.com/albums/hh67 ... bsibvn.jpg
Former toys -
67 Pontiac Firebird 400 convertible (sold 9/13) - http://i253.photobucket.com/albums/hh67 ... bird-1.jpg
67 Ford Fairlane GT - 390 / 4 speed (sold 7/15) - http://i253.photobucket.com/albums/hh67 ... c5hu8z.jpg
Current toys -
69 Ford F350 Crew Cab - 460 / C6 - http://i253.photobucket.com/albums/hh67 ... lqgskp.jpg
31 Ford Vicky - 1955 270 Red Ram Hemi / 4 speed - http://i253.photobucket.com/albums/hh67 ... bsibvn.jpg
Former toys -
67 Pontiac Firebird 400 convertible (sold 9/13) - http://i253.photobucket.com/albums/hh67 ... bird-1.jpg
67 Ford Fairlane GT - 390 / 4 speed (sold 7/15) - http://i253.photobucket.com/albums/hh67 ... c5hu8z.jpg
-
Calfdemon
- 100% FORDified!
- Posts: 2672
- Joined: Tue May 25, 2010 11:31 pm
- Location: California, Santa Clarita
Re: May I ask for advice on Beam's 140" WSCH300 seat beats?
Hey RobRoy, got my swatches in the mail today. Definately going with Military Green as that matches best with my interior. Thanks again for the info on the seatbelt company.
Anyway, I am now at the stage where I will be ordering my seatbelts sometime this next week. Still looking for some insight on what I should do with my threading of my shoulder belt mounts. Anyone have any suggestions as to how I should proceed thread-wise?
Anyway, I am now at the stage where I will be ordering my seatbelts sometime this next week. Still looking for some insight on what I should do with my threading of my shoulder belt mounts. Anyone have any suggestions as to how I should proceed thread-wise?
-Rich
Current toys -
69 Ford F350 Crew Cab - 460 / C6 - http://i253.photobucket.com/albums/hh67 ... lqgskp.jpg
31 Ford Vicky - 1955 270 Red Ram Hemi / 4 speed - http://i253.photobucket.com/albums/hh67 ... bsibvn.jpg
Former toys -
67 Pontiac Firebird 400 convertible (sold 9/13) - http://i253.photobucket.com/albums/hh67 ... bird-1.jpg
67 Ford Fairlane GT - 390 / 4 speed (sold 7/15) - http://i253.photobucket.com/albums/hh67 ... c5hu8z.jpg
Current toys -
69 Ford F350 Crew Cab - 460 / C6 - http://i253.photobucket.com/albums/hh67 ... lqgskp.jpg
31 Ford Vicky - 1955 270 Red Ram Hemi / 4 speed - http://i253.photobucket.com/albums/hh67 ... bsibvn.jpg
Former toys -
67 Pontiac Firebird 400 convertible (sold 9/13) - http://i253.photobucket.com/albums/hh67 ... bird-1.jpg
67 Ford Fairlane GT - 390 / 4 speed (sold 7/15) - http://i253.photobucket.com/albums/hh67 ... c5hu8z.jpg
-
robroy
- 100% FORDified!
- Posts: 3768
- Joined: Sun Jul 06, 2008 4:36 pm
- Location: California, Salinas
Re: May I ask for advice on Beam's 140" WSCH300 seat belts?
Good afternoon!
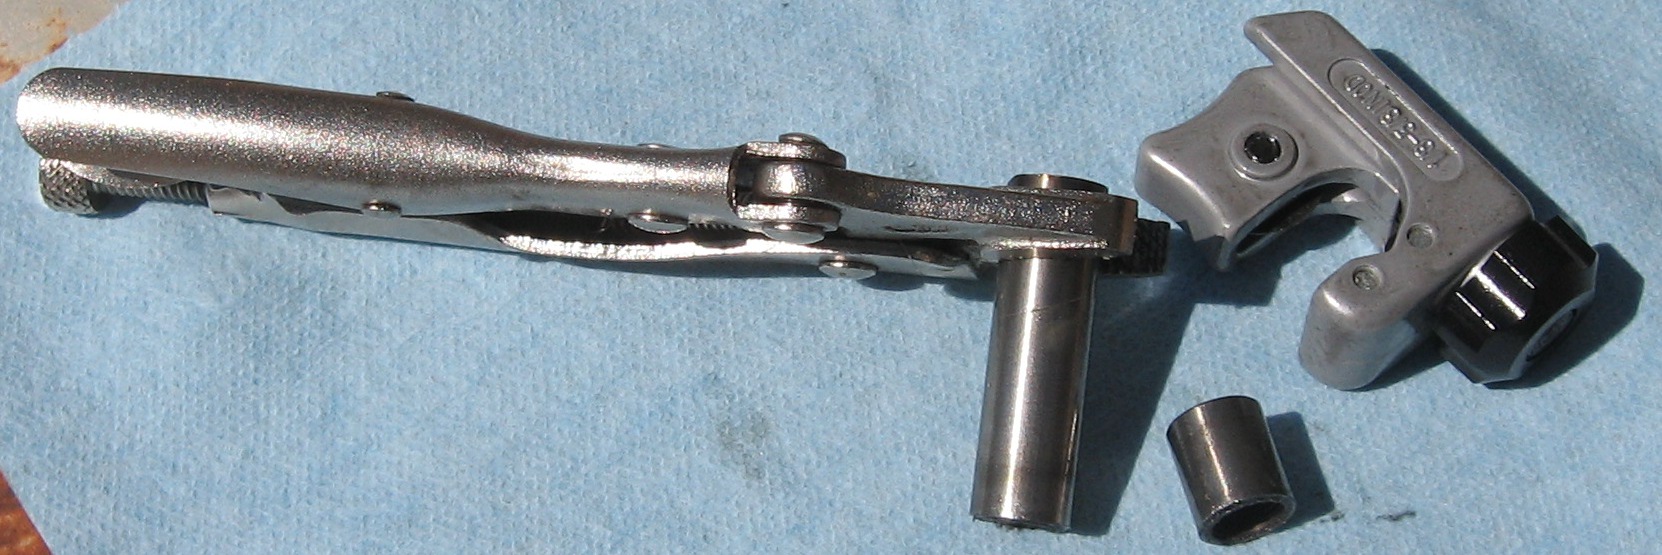
I looked around for something suitable to prepare shoulder strap bracket spacers (to keep the brackets away from the cab interior skin), and found some old, junk valve guides. Not knowing anything about valve guides, I decided to slice off a section to see if it was suitable. Here's the guide:

And here I've sliced off a section with the pipe cutter. It wasn't especially difficult to cut, which makes me think it might not be a good material for the spacers.

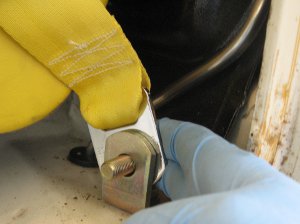
Here's the cut off section fit over the 3/8-24 shoulder bracket bolt; it's a nice fit, and it slips through the hole in the bracket, allowing the bracket to pivot freely once installed.
Here you can see how nicely the ad-hoc spacer fits through the bracket hole.
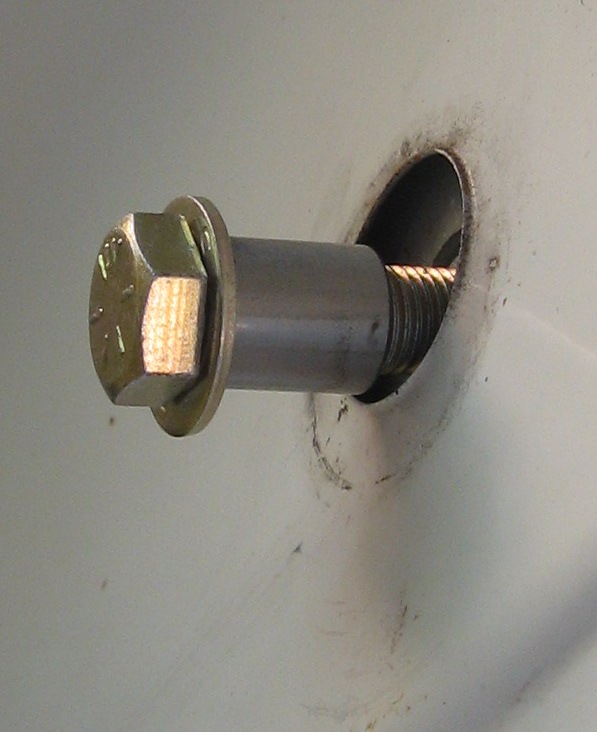
Y'all can see how the ad-hoc spacer allows the bolt to be tightened without putting pressure on the shoulder bracket; the pressure's put right on the rim of the insert instead.

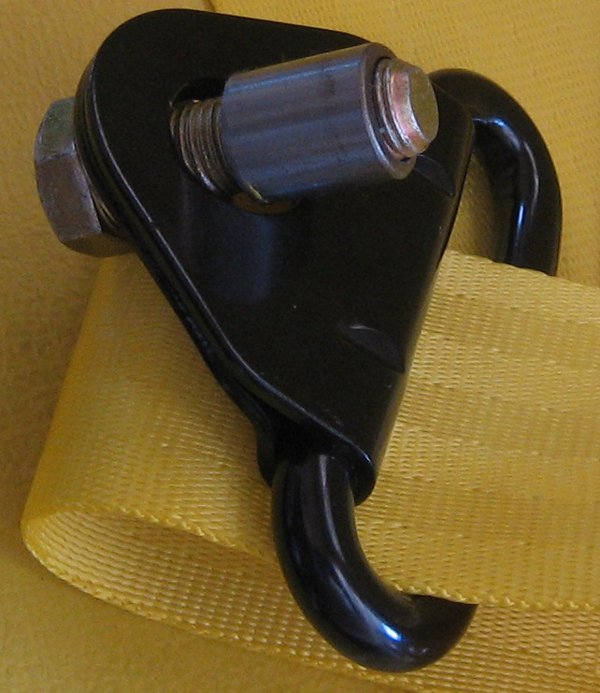
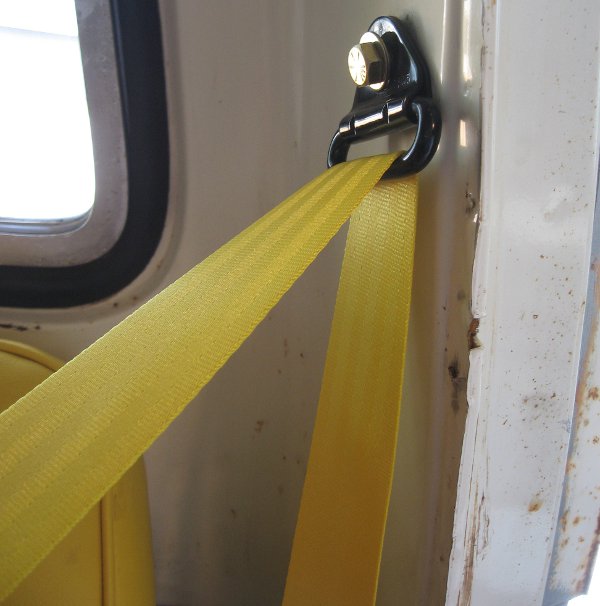
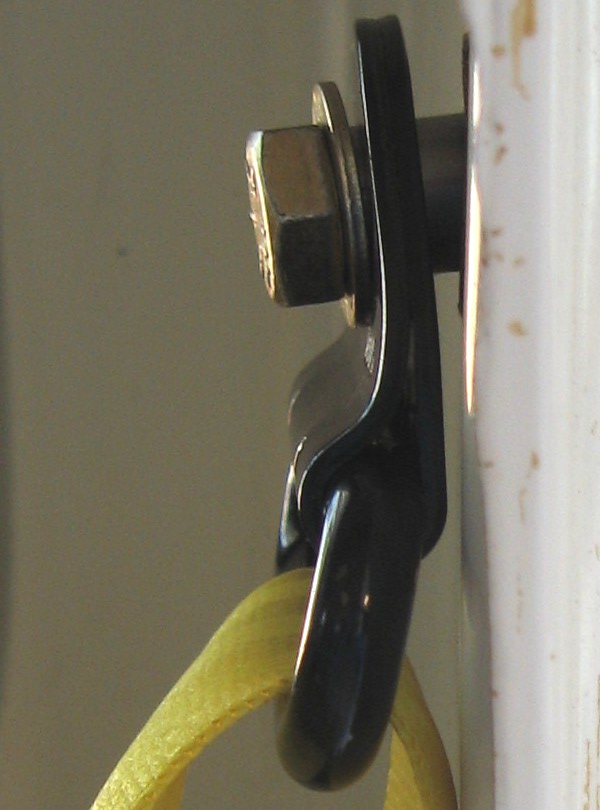
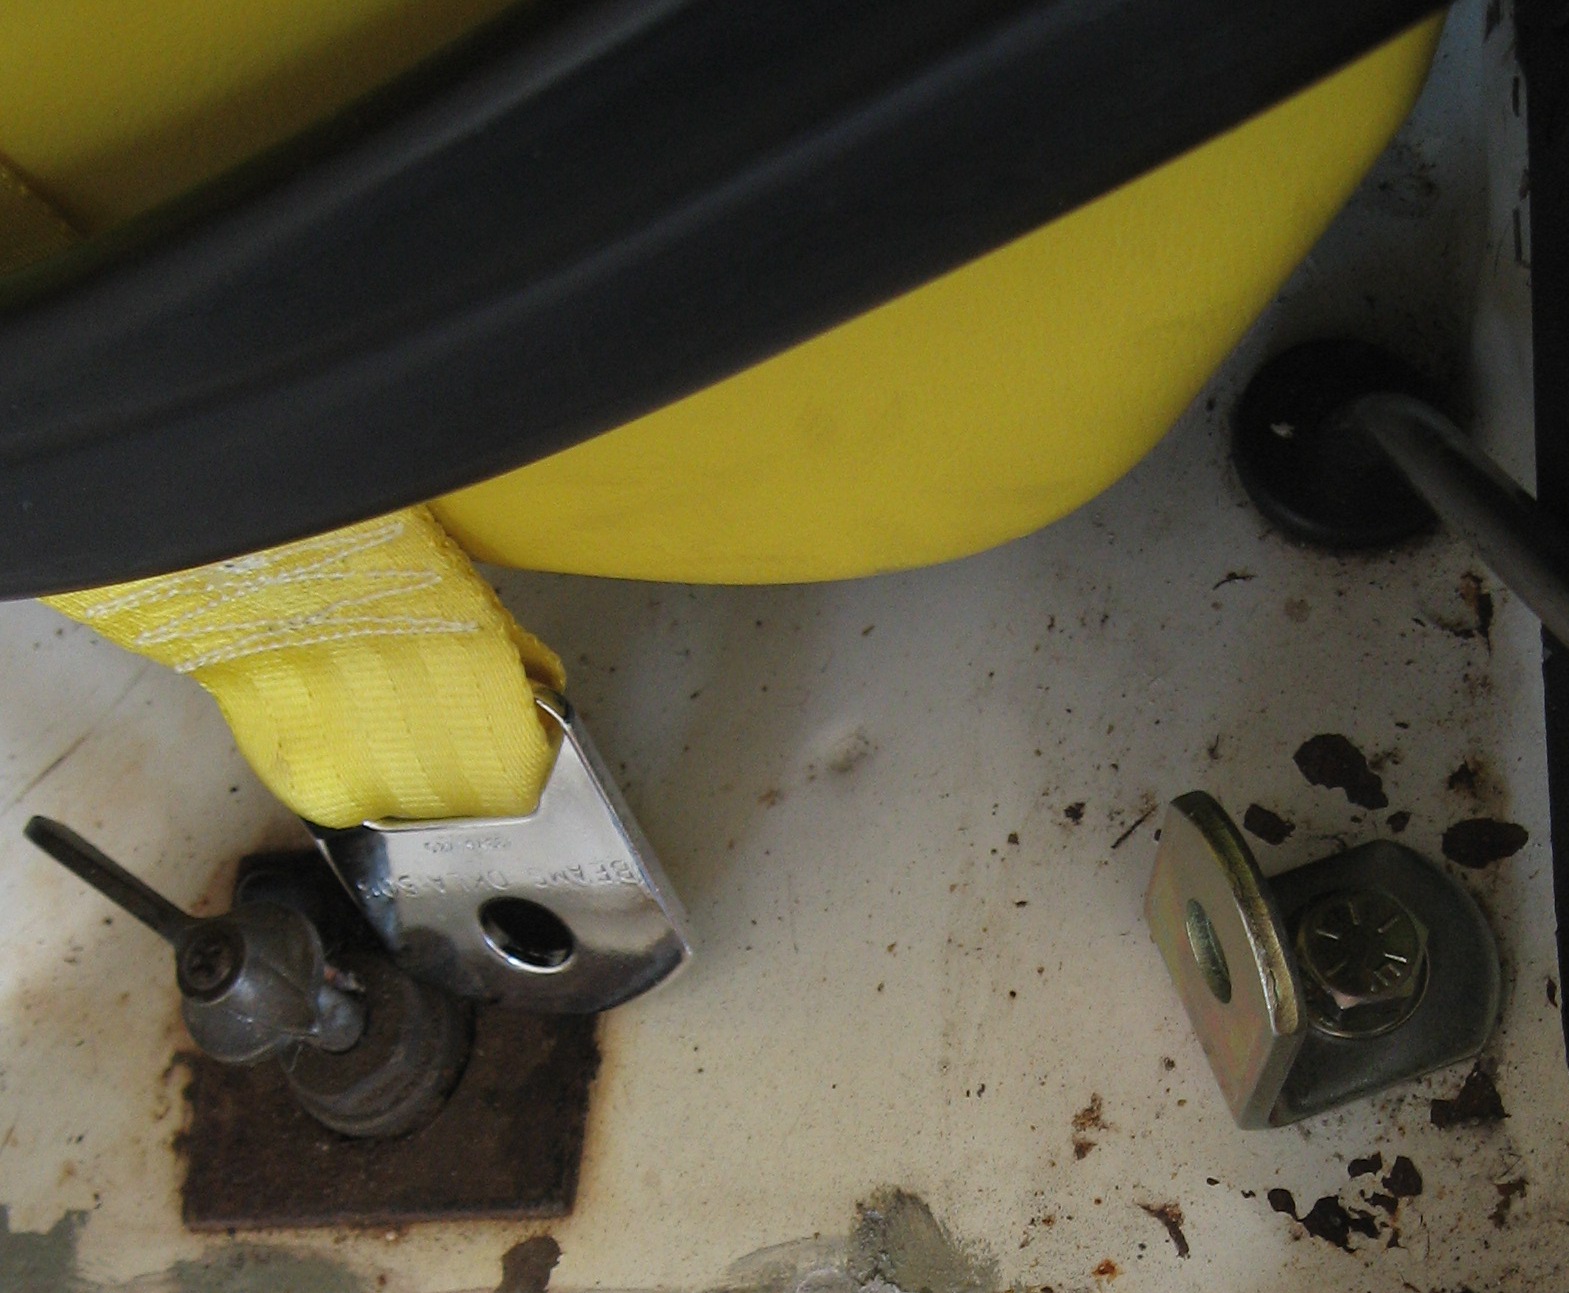
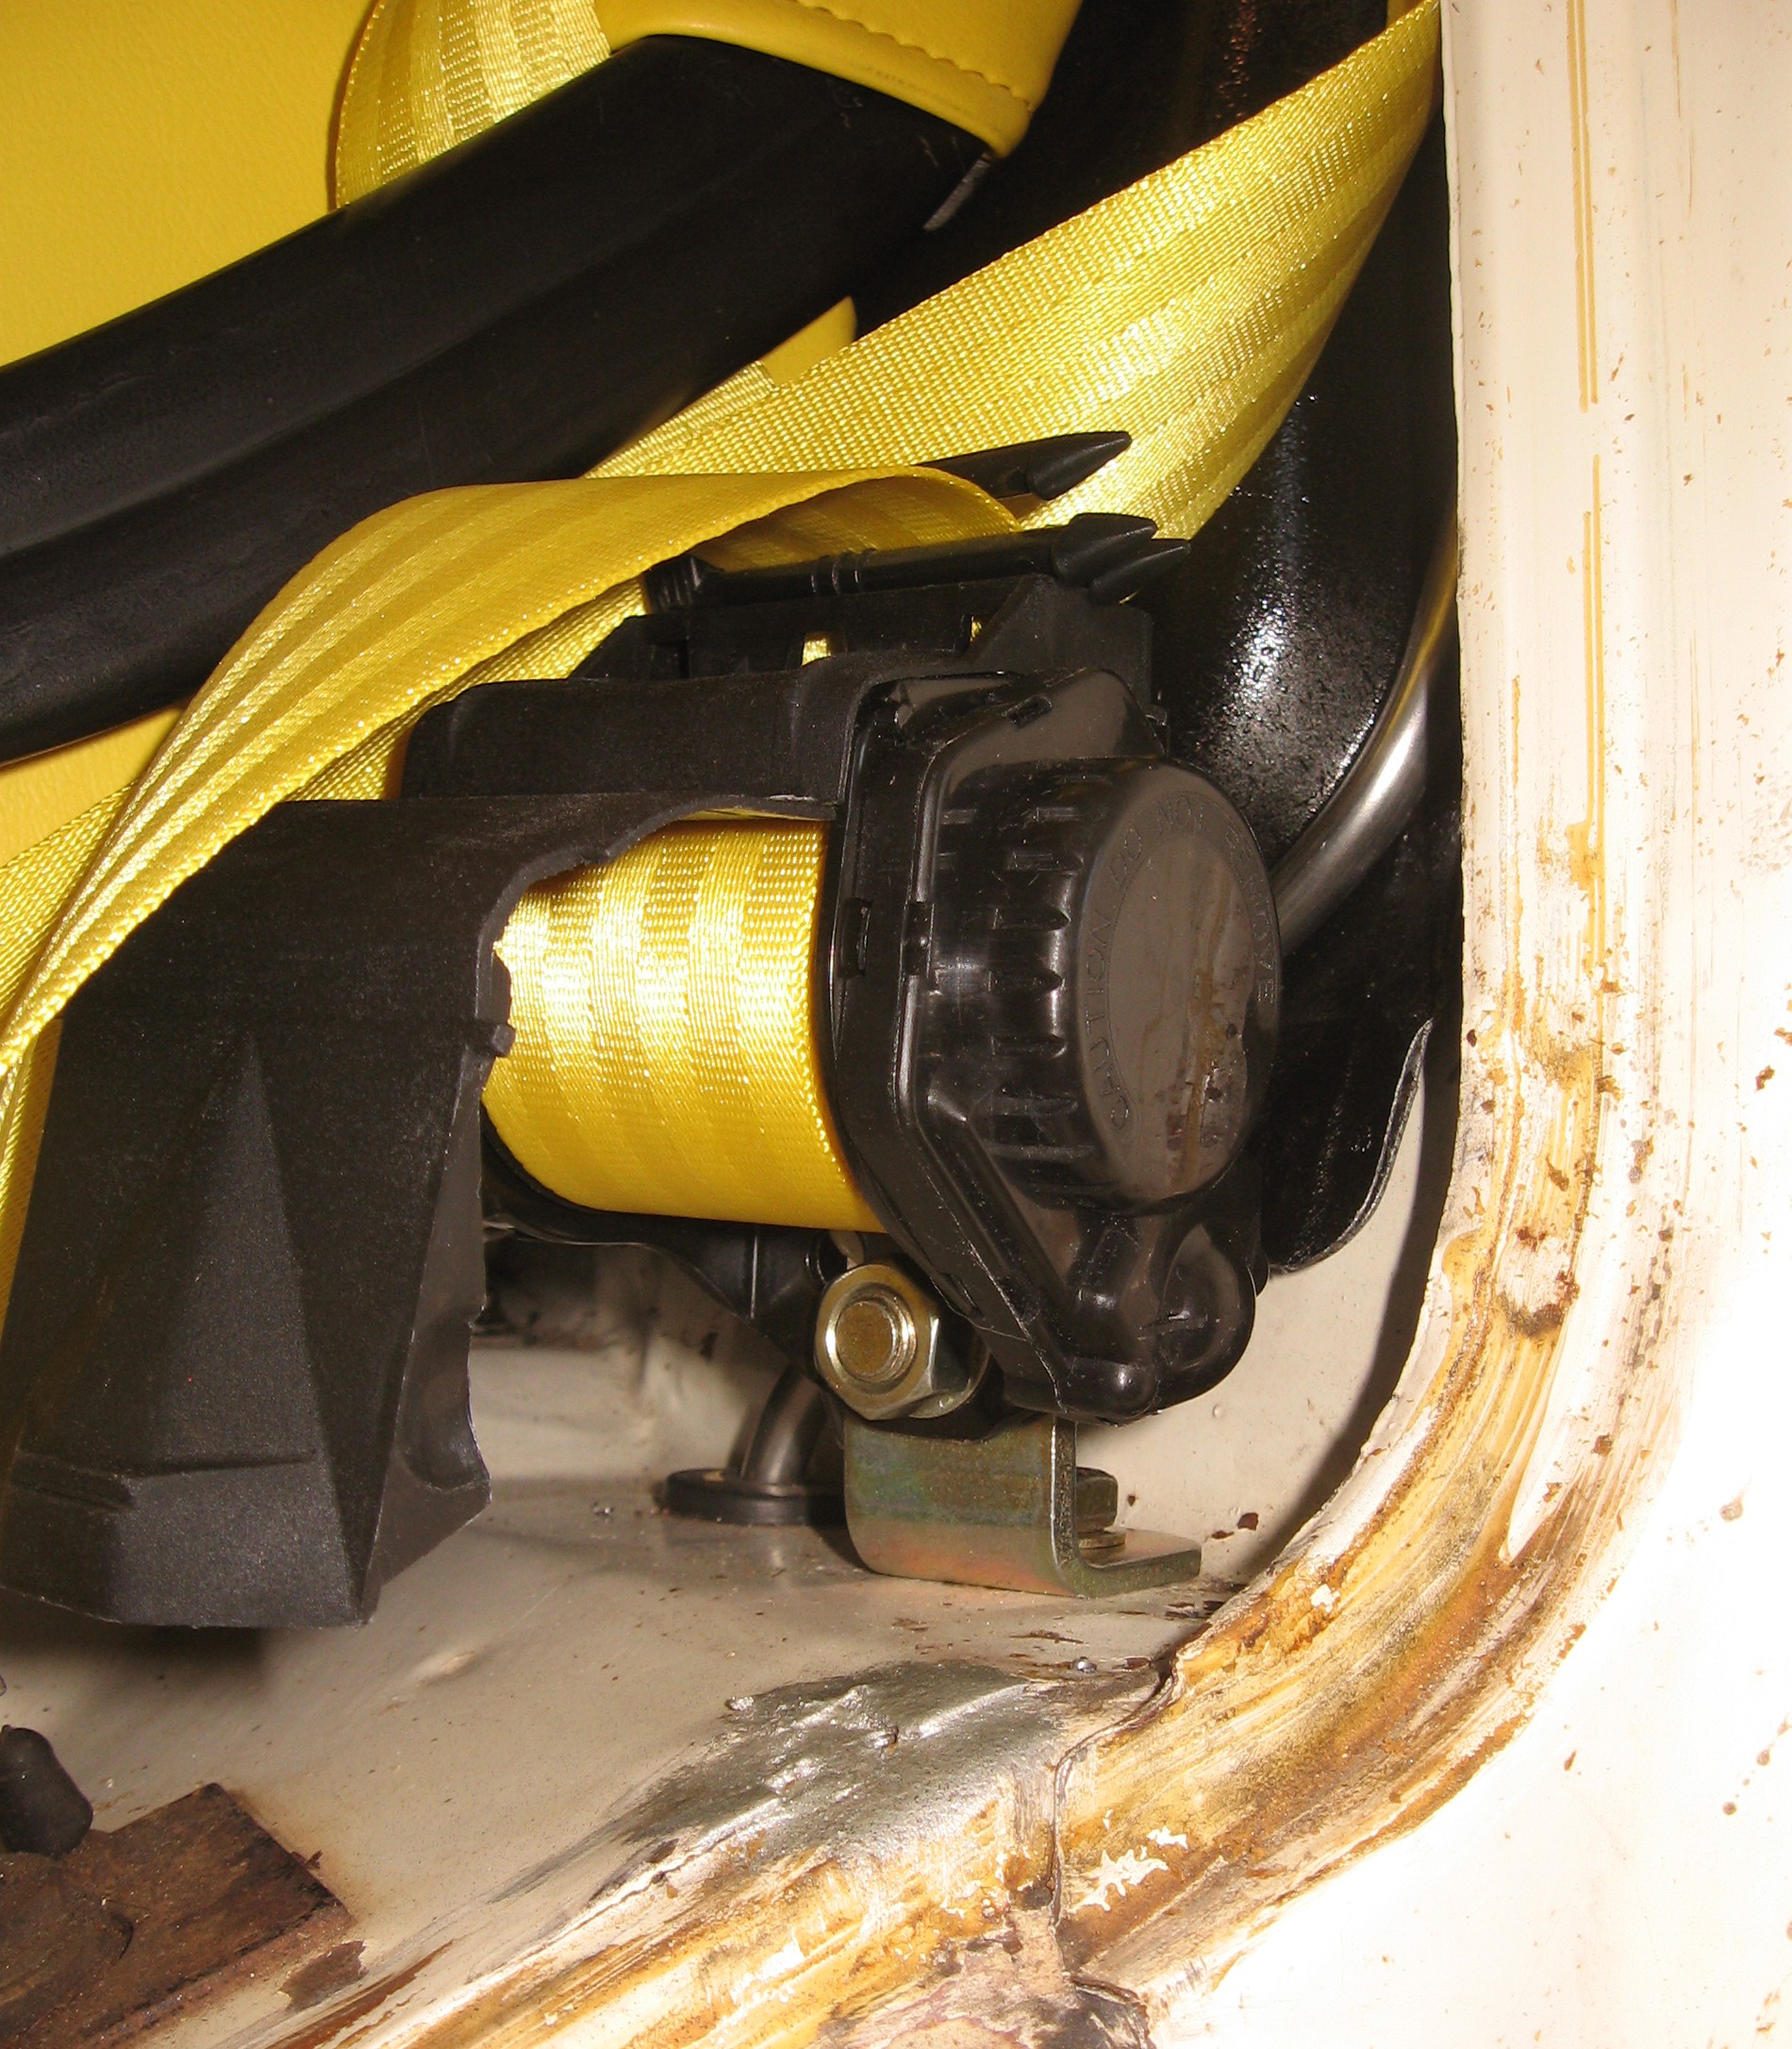
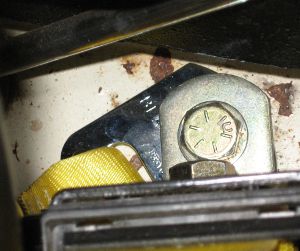
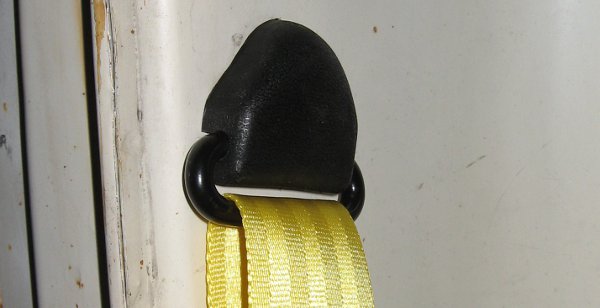
Here's the installed shoulder bracket. You can see that it has enough room to swivel around freely without rubbing against the cab skin. I'm really not sure whether or not this is an acceptable way to fasten this area together, so I'll ask about that in the questions section at the end of this post.

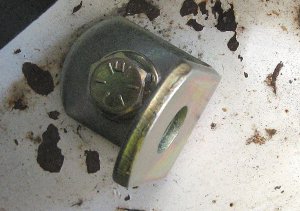
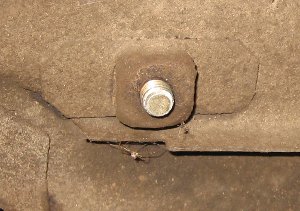
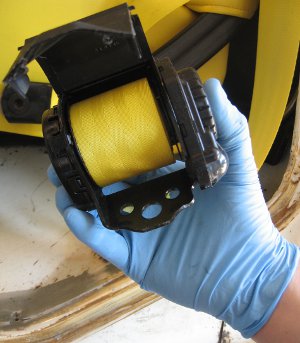
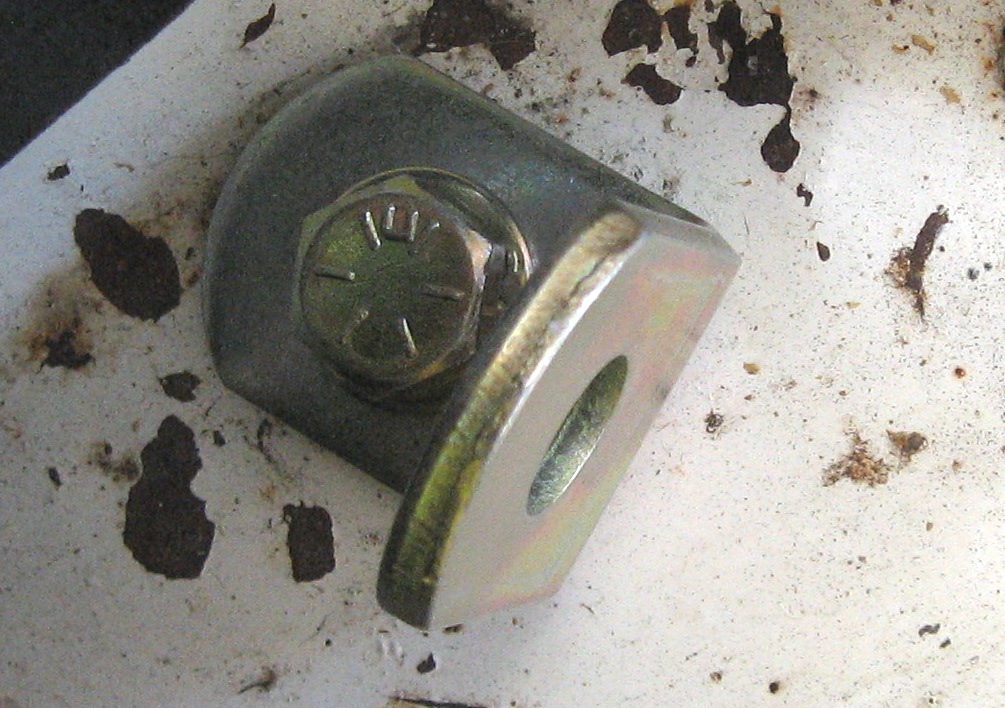
I'm guessing that this L bracket's intended to be used to mount the roll-up belt assembly (right), and also serve as an anchor for the lap belt (left).
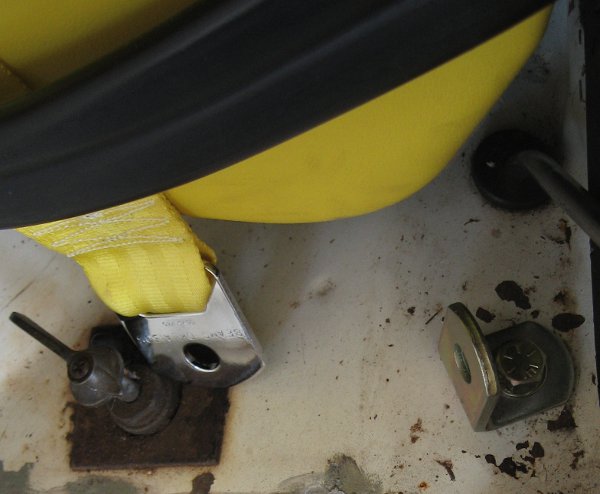
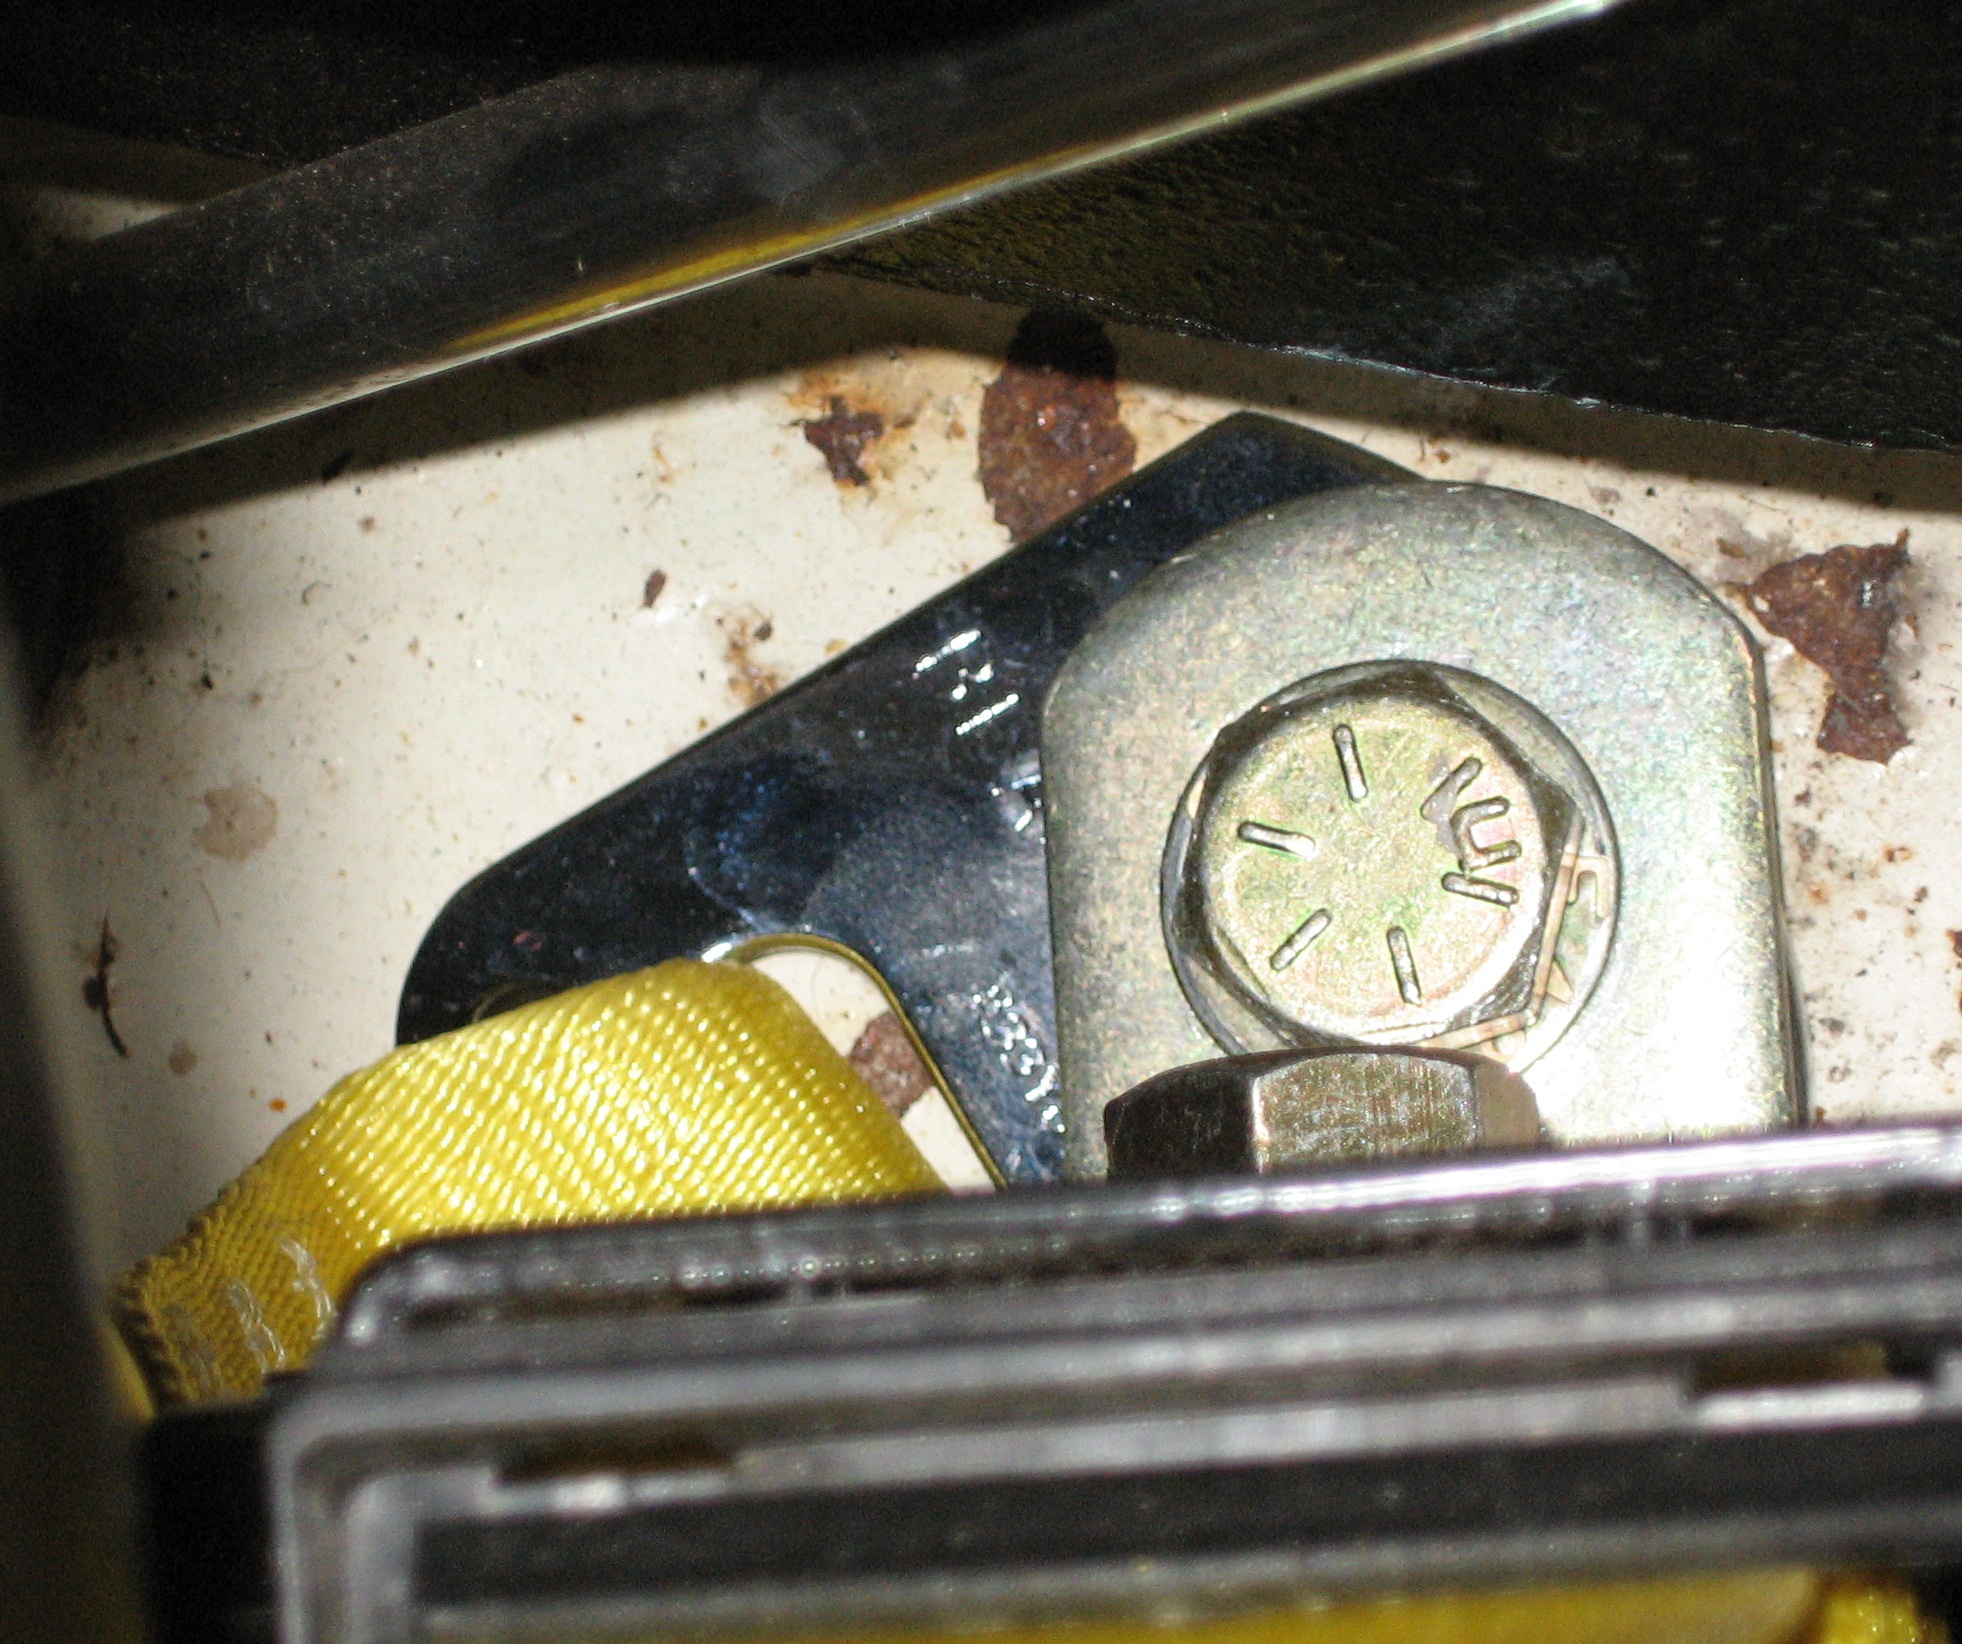
Here's a better photo of the bracket (left). On the right you can see the substantial captive nut that's installed under the cab.
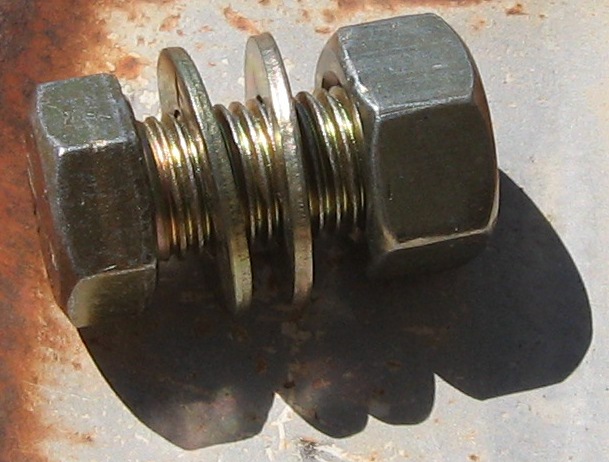
Here's the hardware I'll use to secure the roll-up belt assembly and lap belt terminal to the L bracket.

I thought I'd secure the lap belt terminal in front of the L bracket (left), but then figured it would be best to keep it as far away from the roll-up assembly as possible, so I moved it to the back (right).

Here's the roll-up assembly being secured to the front of the L bracket. I'm not certain that I'm doing this correctly, yet I couldn't see any other feasible way (that would still allow the door to close, that is).
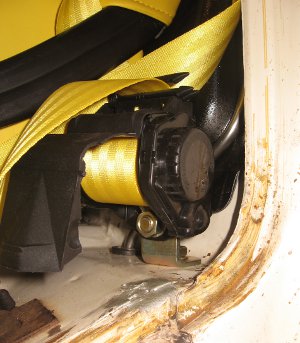
A couple of photos of the temporarily installed seat belt:
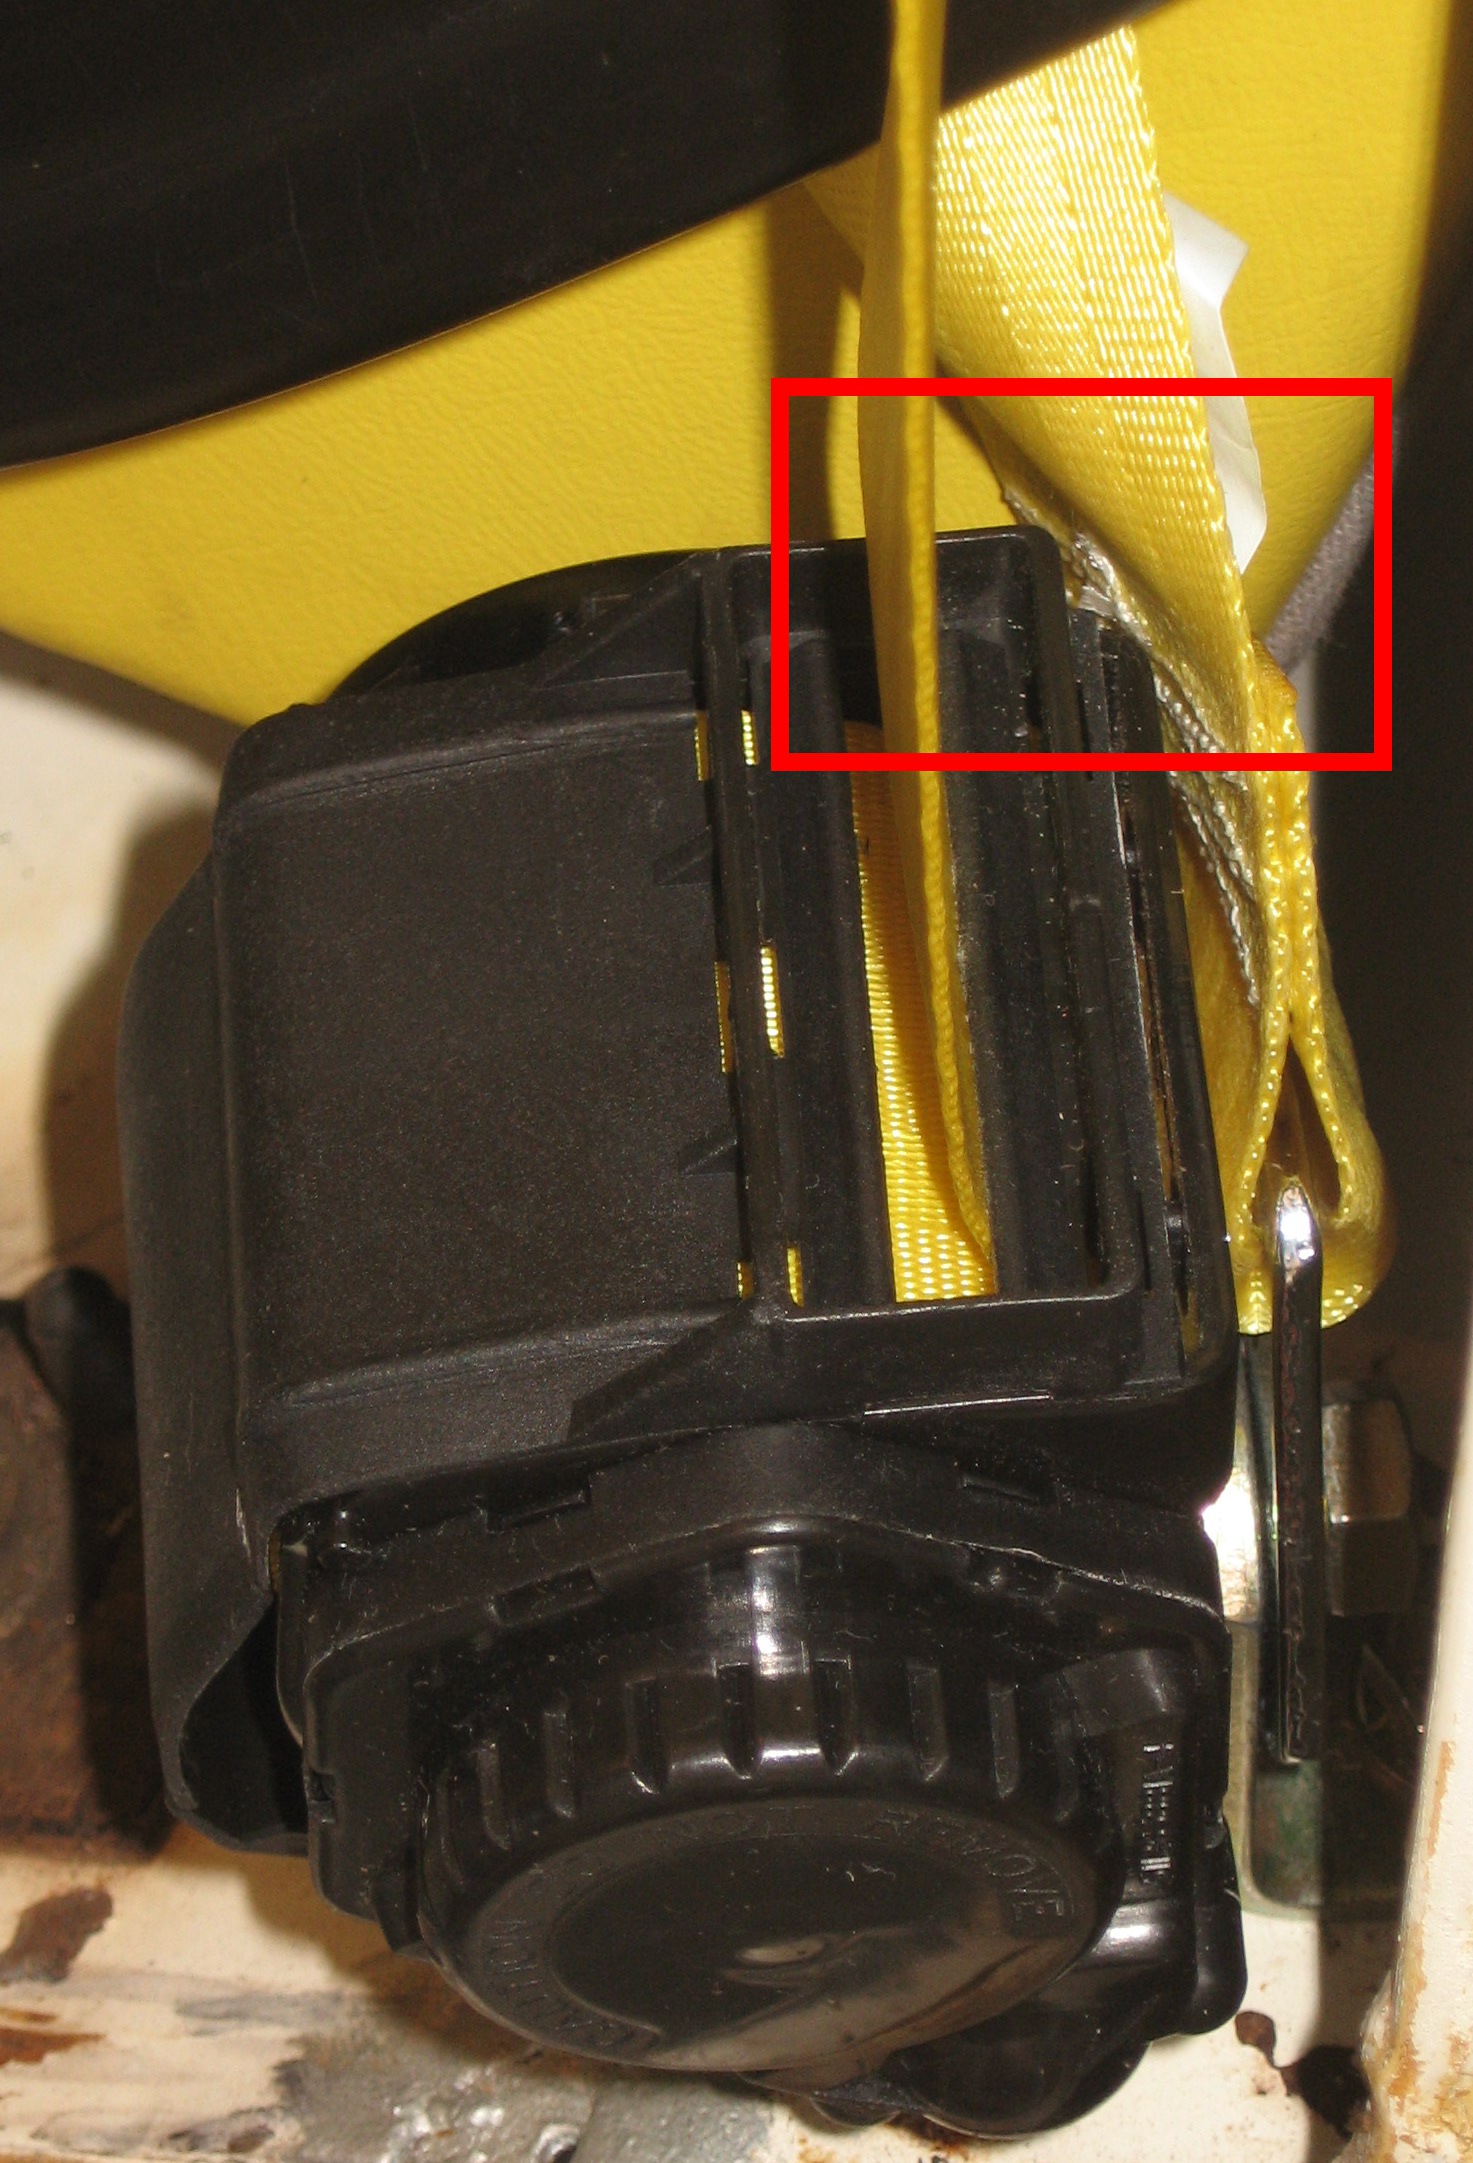
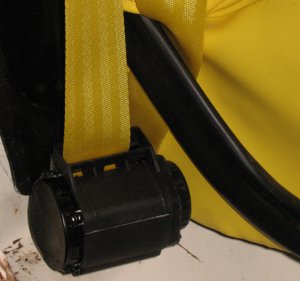
One concern I have is that the belt webbing tends to ride on the rear of the roll-up assembly housing, as shown in the red rectangle here. I might try to rotate the roll-up assembly slightly to see if I can mitigate this.

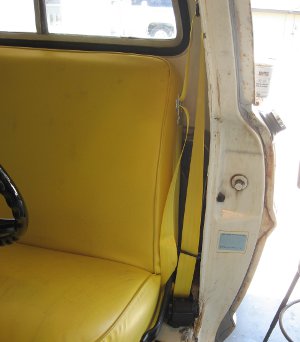
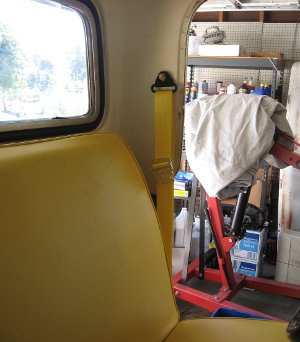
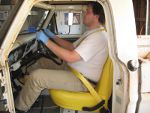
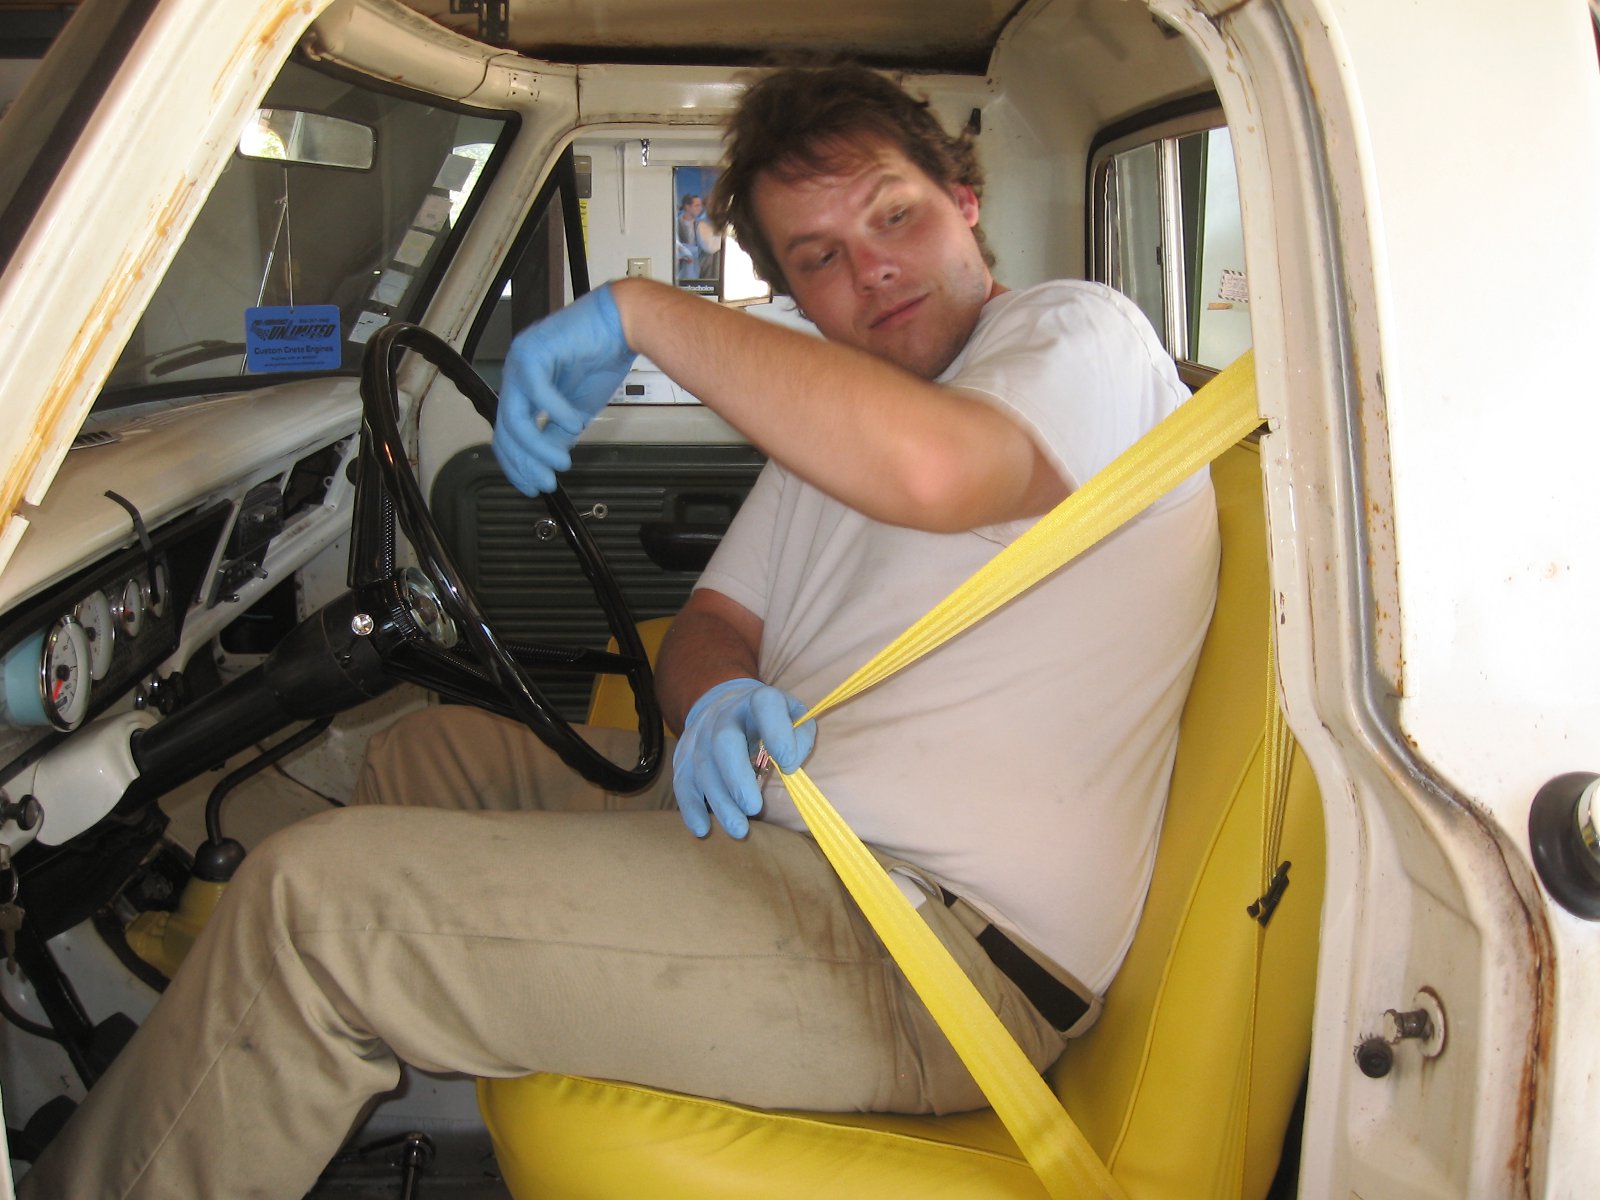
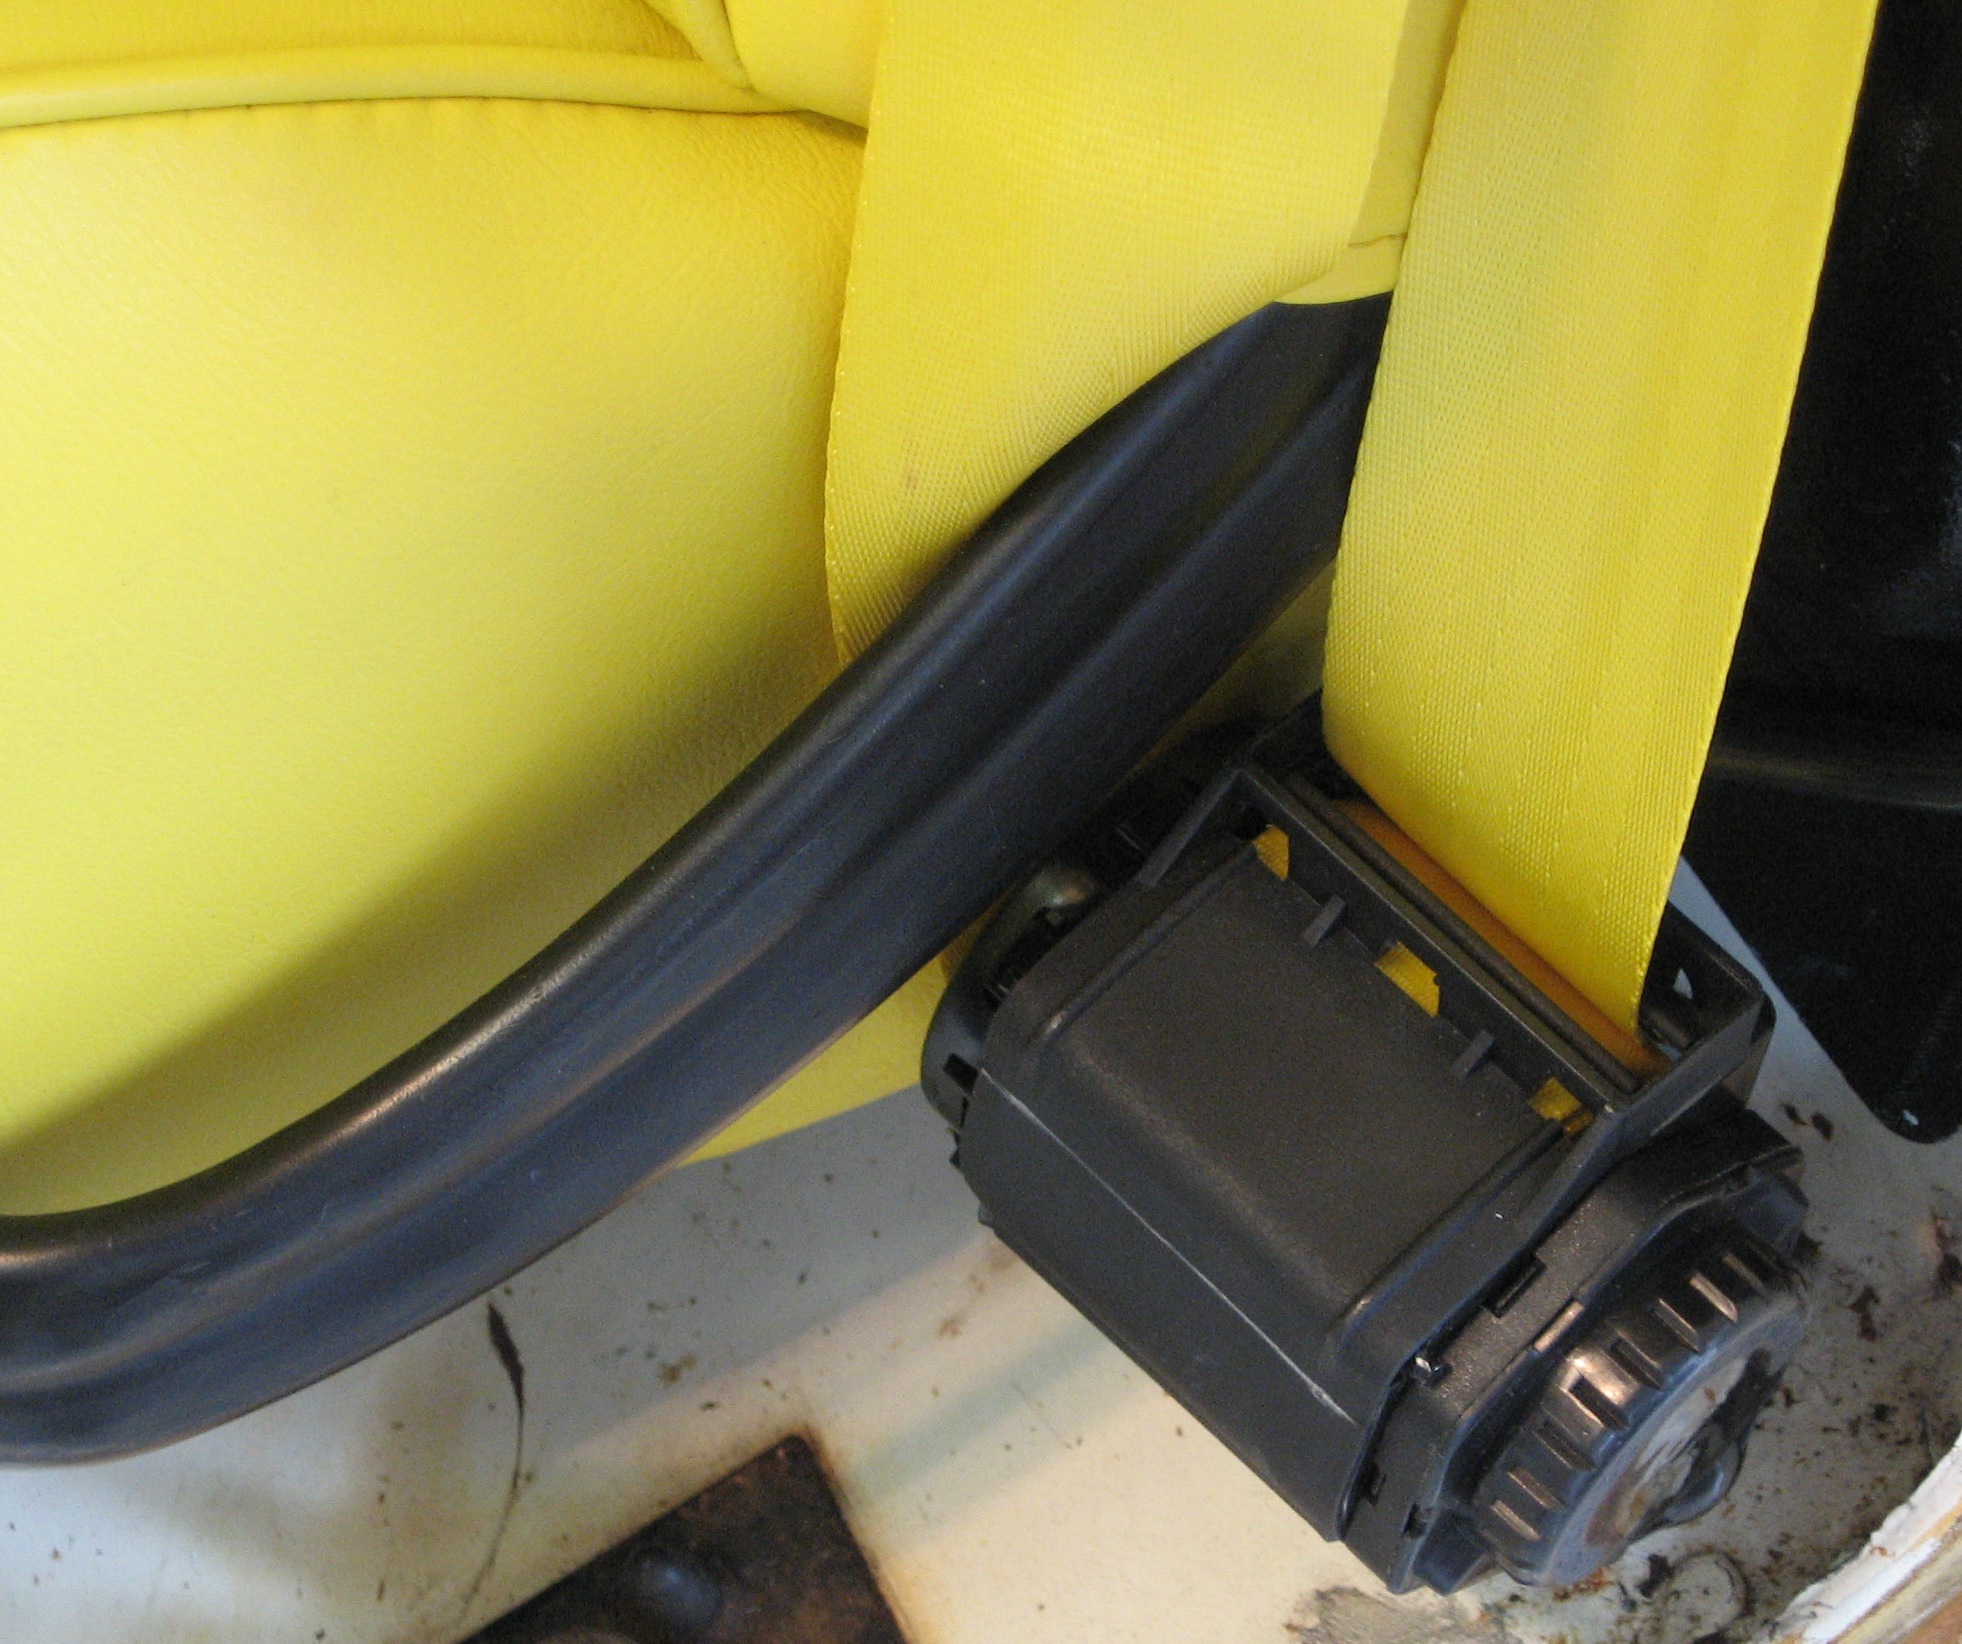
Here I'm putting on and wearing the belt--it will take a little getting-used-to, and I'll probably want fiddle around to get it adjusted in an ideal way. But it looks like it will basically work!


Here's how the shoulder strap area looks with Kasie at the wheel.
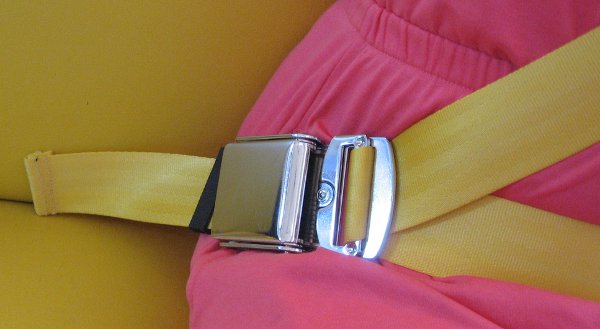
And here's the lap buckle. I think that if I were to shorten the stationary side, it might make the angles work out more favorably (and leave less seat belt material to flop around when it's not in use).
This Afternoon's Questions:
Robroy
I looked around for something suitable to prepare shoulder strap bracket spacers (to keep the brackets away from the cab interior skin), and found some old, junk valve guides. Not knowing anything about valve guides, I decided to slice off a section to see if it was suitable. Here's the guide:
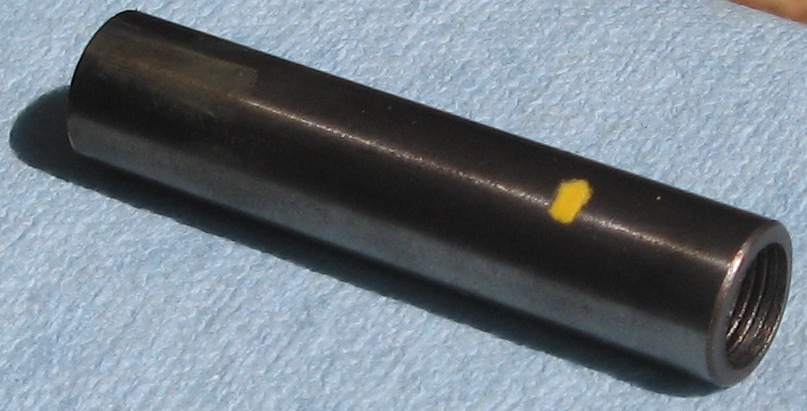
And here I've sliced off a section with the pipe cutter. It wasn't especially difficult to cut, which makes me think it might not be a good material for the spacers.
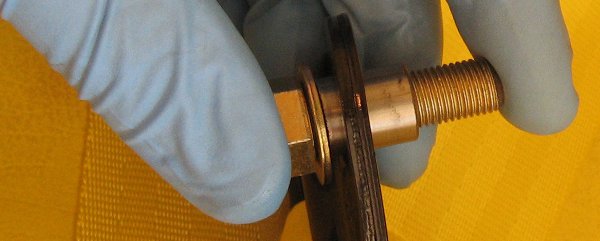
Here's the cut off section fit over the 3/8-24 shoulder bracket bolt; it's a nice fit, and it slips through the hole in the bracket, allowing the bracket to pivot freely once installed.

Here you can see how nicely the ad-hoc spacer fits through the bracket hole.
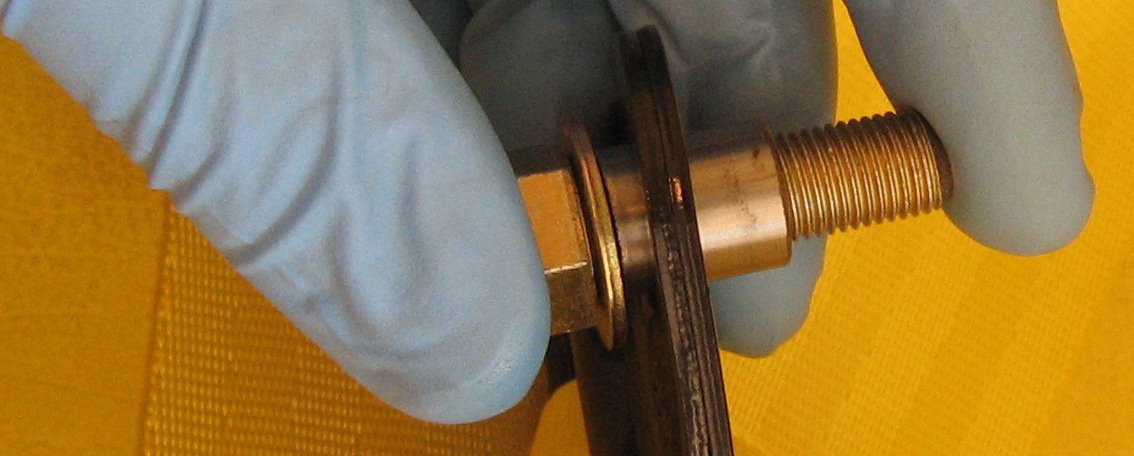
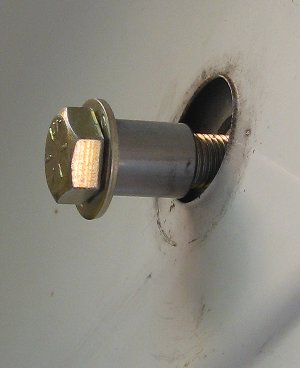
Y'all can see how the ad-hoc spacer allows the bolt to be tightened without putting pressure on the shoulder bracket; the pressure's put right on the rim of the insert instead.

Here's the installed shoulder bracket. You can see that it has enough room to swivel around freely without rubbing against the cab skin. I'm really not sure whether or not this is an acceptable way to fasten this area together, so I'll ask about that in the questions section at the end of this post.
I'm guessing that this L bracket's intended to be used to mount the roll-up belt assembly (right), and also serve as an anchor for the lap belt (left).
Here's a better photo of the bracket (left). On the right you can see the substantial captive nut that's installed under the cab.

Here's the hardware I'll use to secure the roll-up belt assembly and lap belt terminal to the L bracket.
I thought I'd secure the lap belt terminal in front of the L bracket (left), but then figured it would be best to keep it as far away from the roll-up assembly as possible, so I moved it to the back (right).
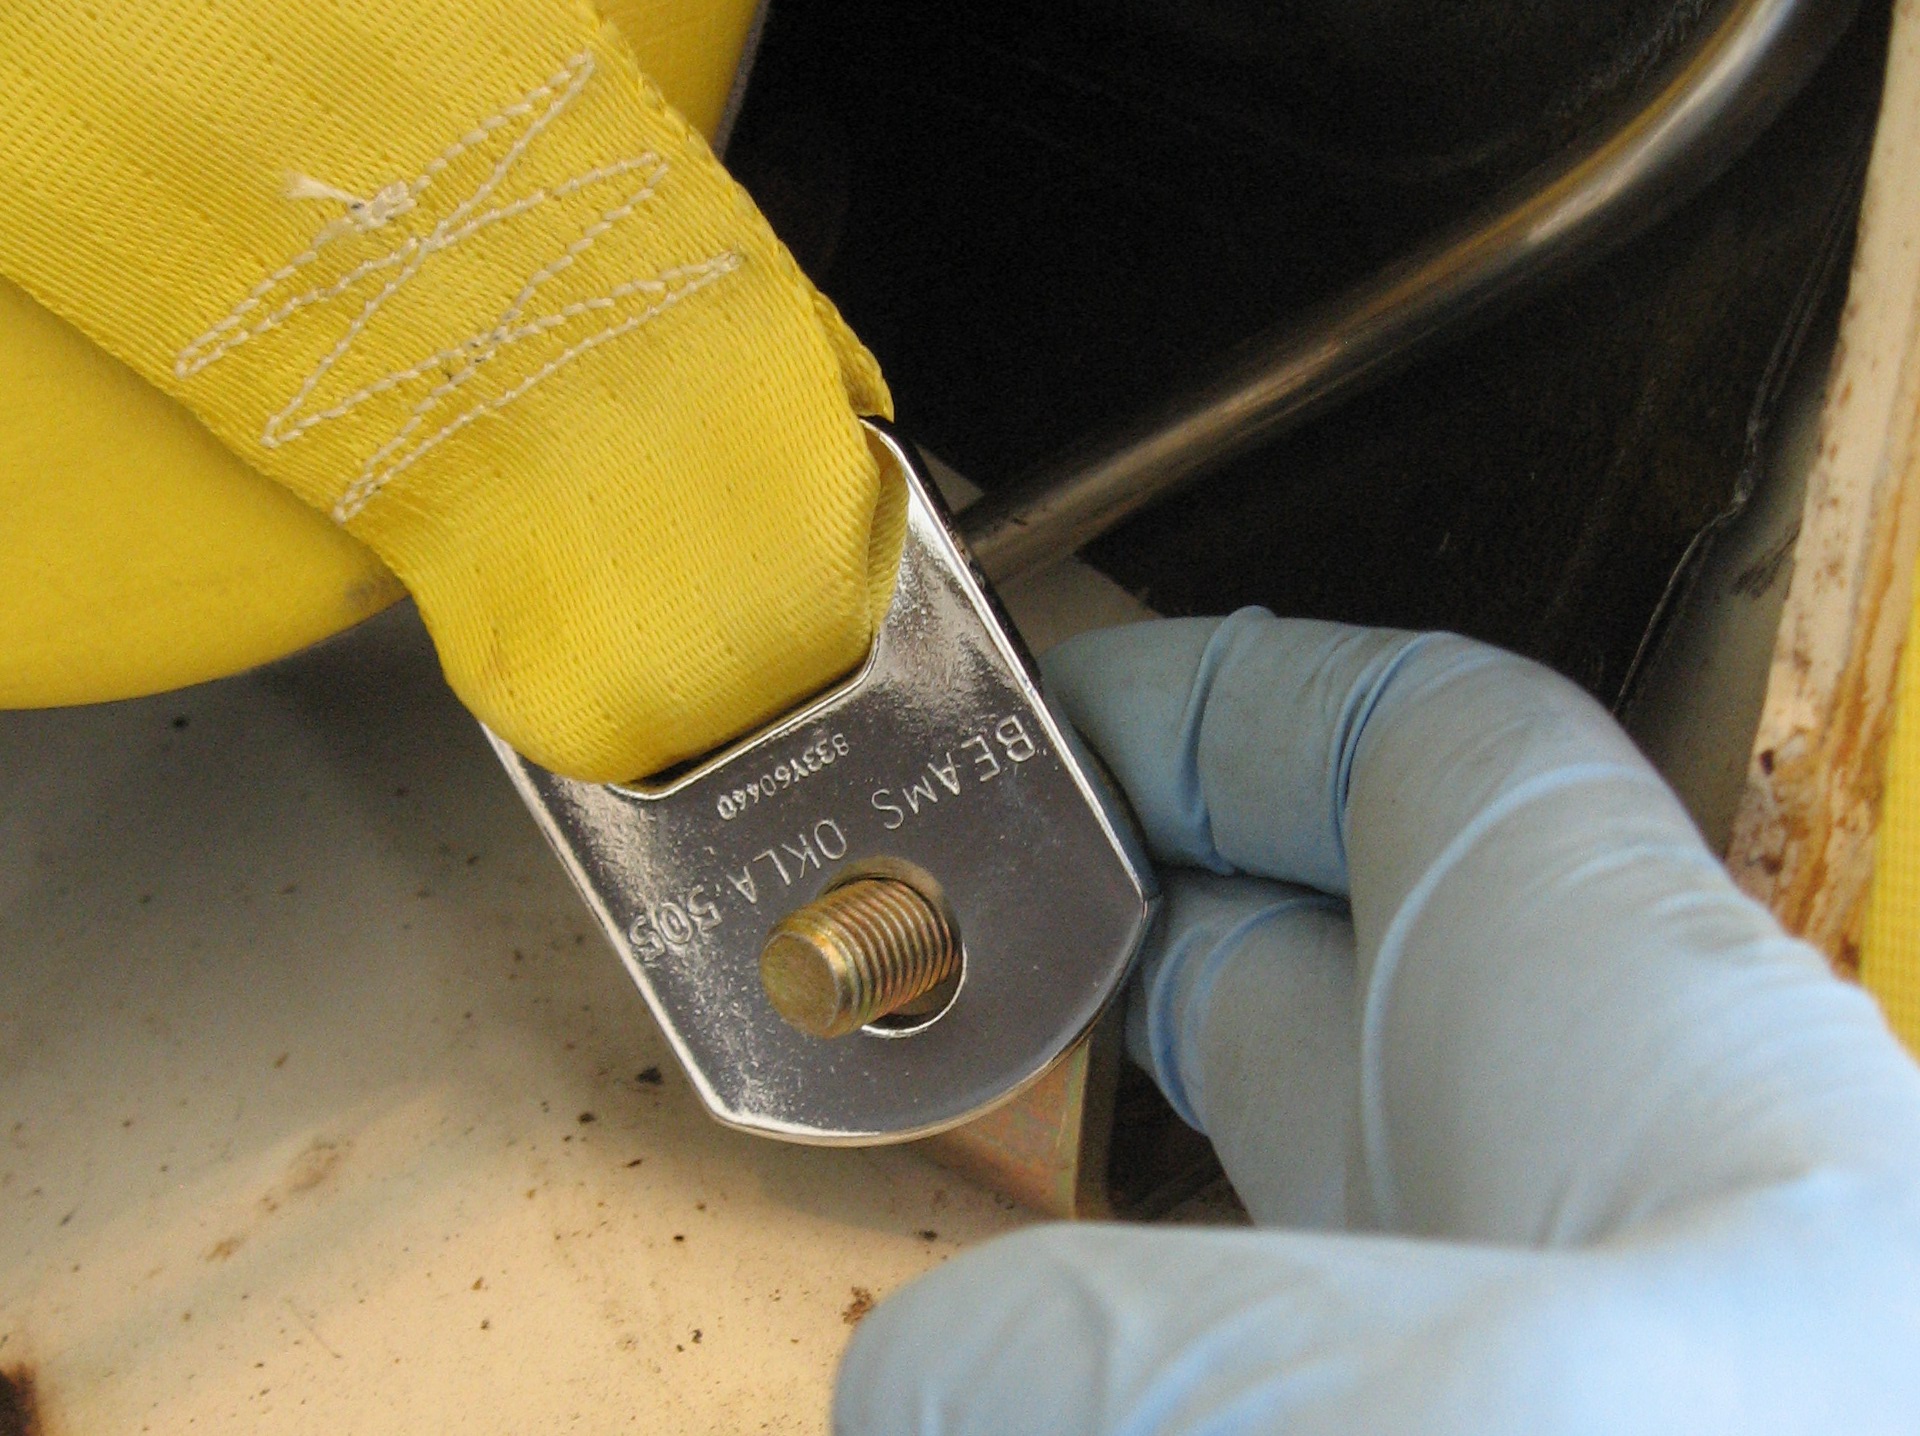

Here's the roll-up assembly being secured to the front of the L bracket. I'm not certain that I'm doing this correctly, yet I couldn't see any other feasible way (that would still allow the door to close, that is).

A couple of photos of the temporarily installed seat belt:


One concern I have is that the belt webbing tends to ride on the rear of the roll-up assembly housing, as shown in the red rectangle here. I might try to rotate the roll-up assembly slightly to see if I can mitigate this.
Here I'm putting on and wearing the belt--it will take a little getting-used-to, and I'll probably want fiddle around to get it adjusted in an ideal way. But it looks like it will basically work!
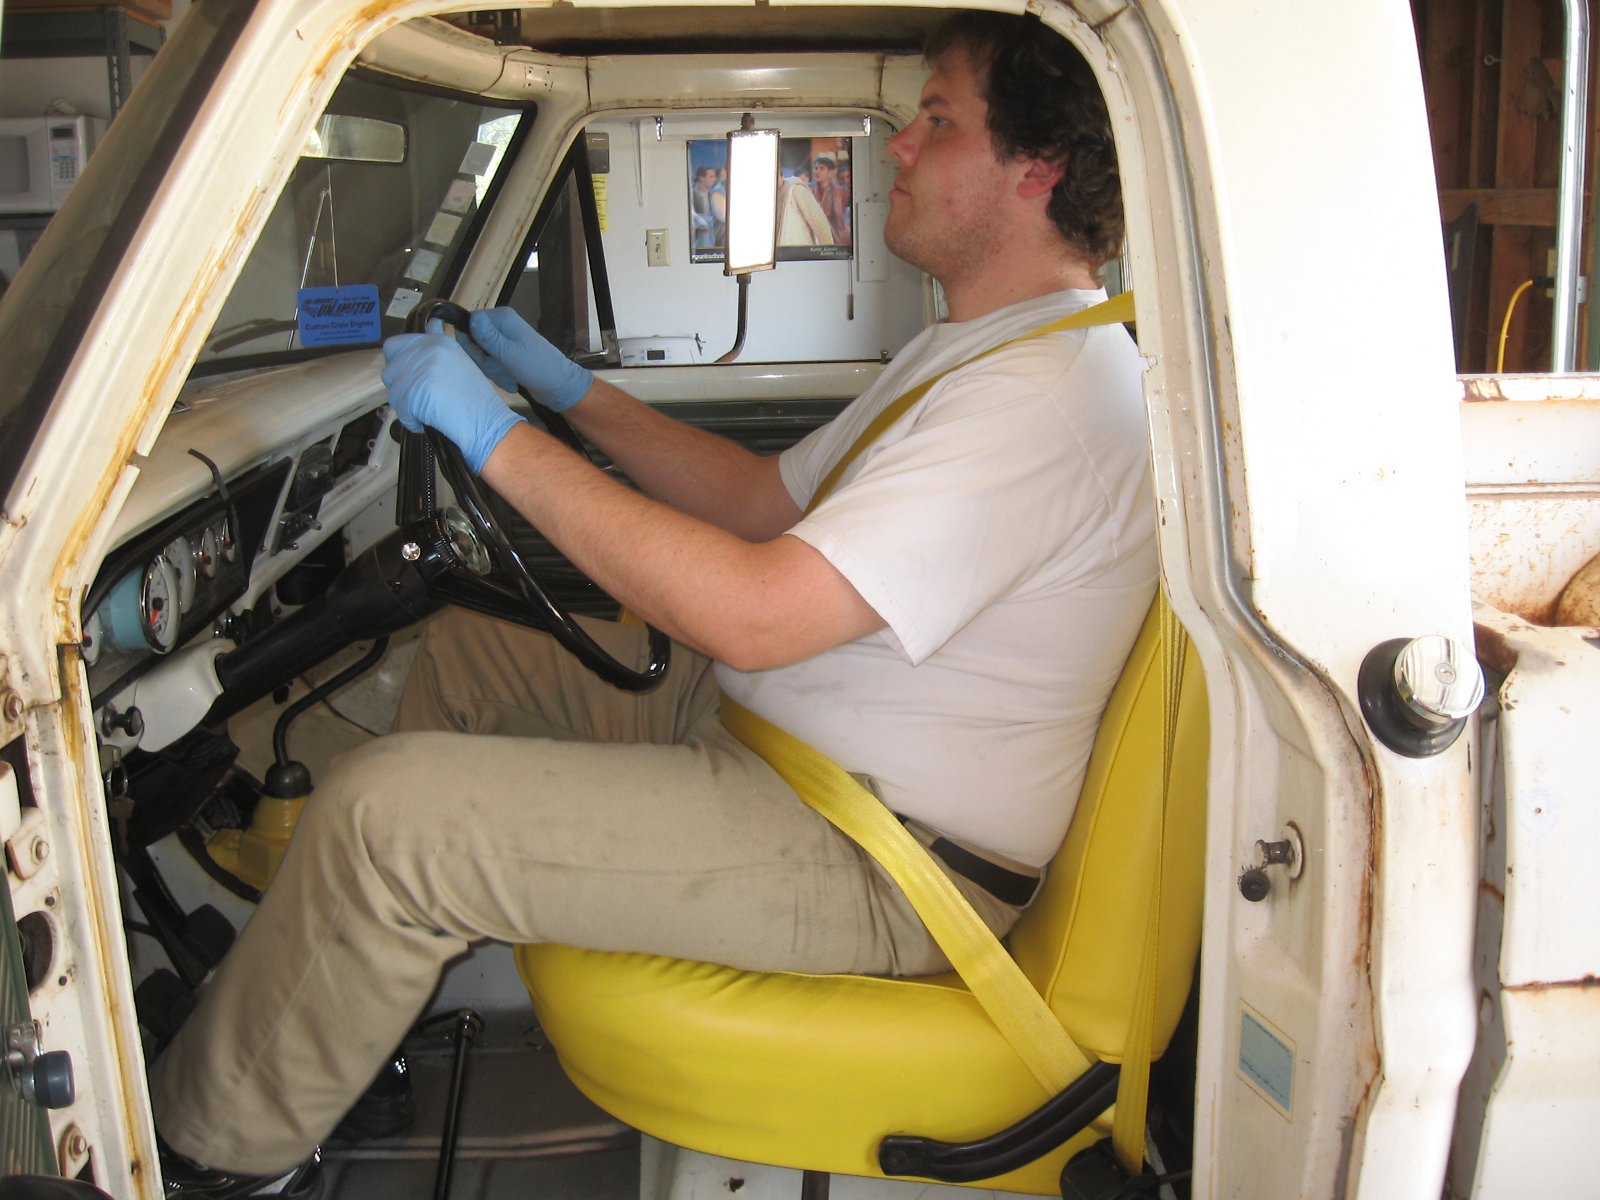


Here's how the shoulder strap area looks with Kasie at the wheel.

And here's the lap buckle. I think that if I were to shorten the stationary side, it might make the angles work out more favorably (and leave less seat belt material to flop around when it's not in use).

This Afternoon's Questions:
- ID 9: Do y'all think that my funny ad-hoc, valve guide spacer idea is OK? Or should I try to find a much stronger material for that spacer?
- ID 10: How much of a problem is it that the lap belt webbing makes contact with the roll-up assembly body?
- ID 11: Do y'all think that I've basically got this put together in a sane fashion? Or is there a different, perhaps much better way of assembling the bracket and fasteners?
Robroy
-
robroy
- 100% FORDified!
- Posts: 3768
- Joined: Sun Jul 06, 2008 4:36 pm
- Location: California, Salinas
Re: May I ask for advice on Beam's 140" WSCH300 seat belts?
Good evening!
I fiddled around with the belt anchor arrangement and managed to find a configuration with fewer snarls (left). And here's how the routing looks now (right and bottom).


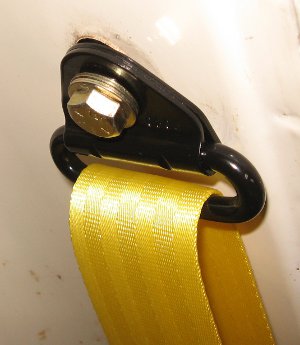
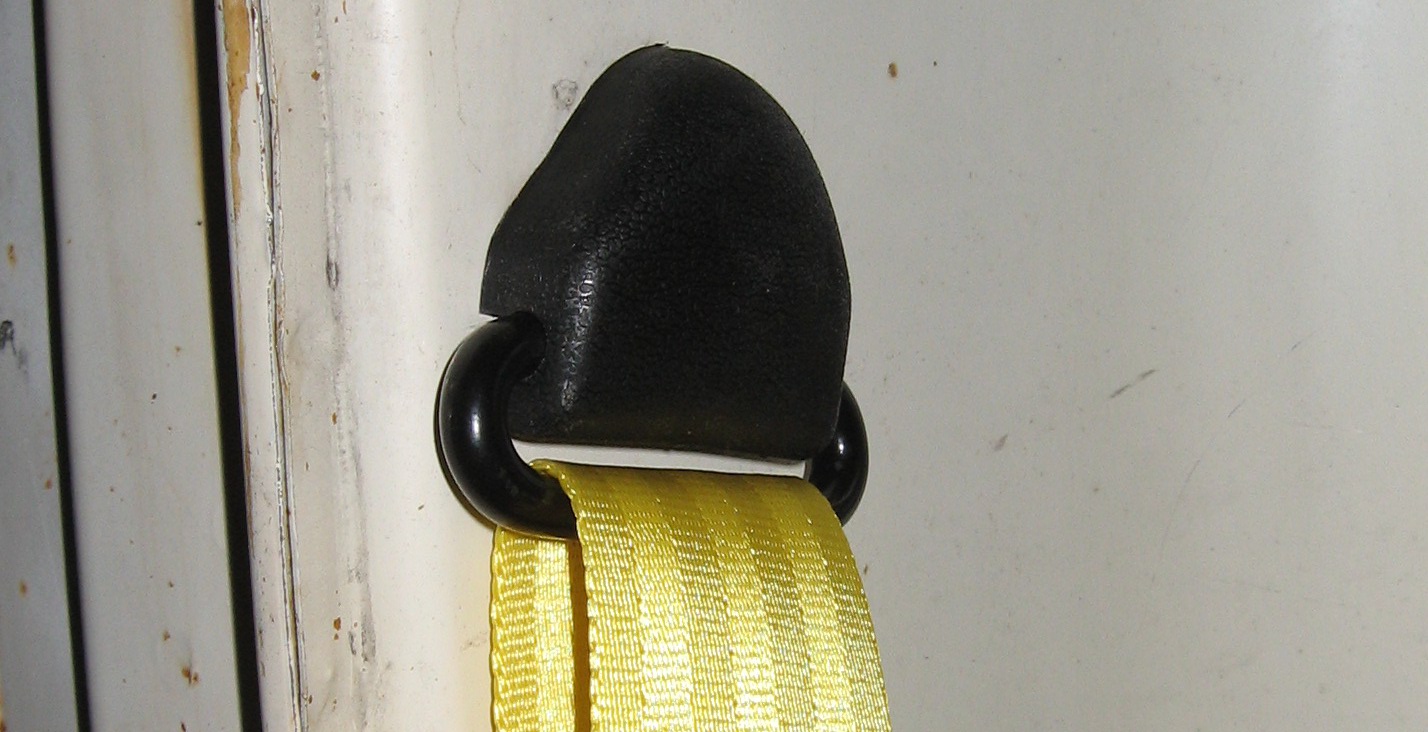
Based on 70_F100's excellent advice, I added another hardened washer to the shoulder anchor bolt head (left). I then torqued it to 25 ft/lbs and snapped the cover on (right).
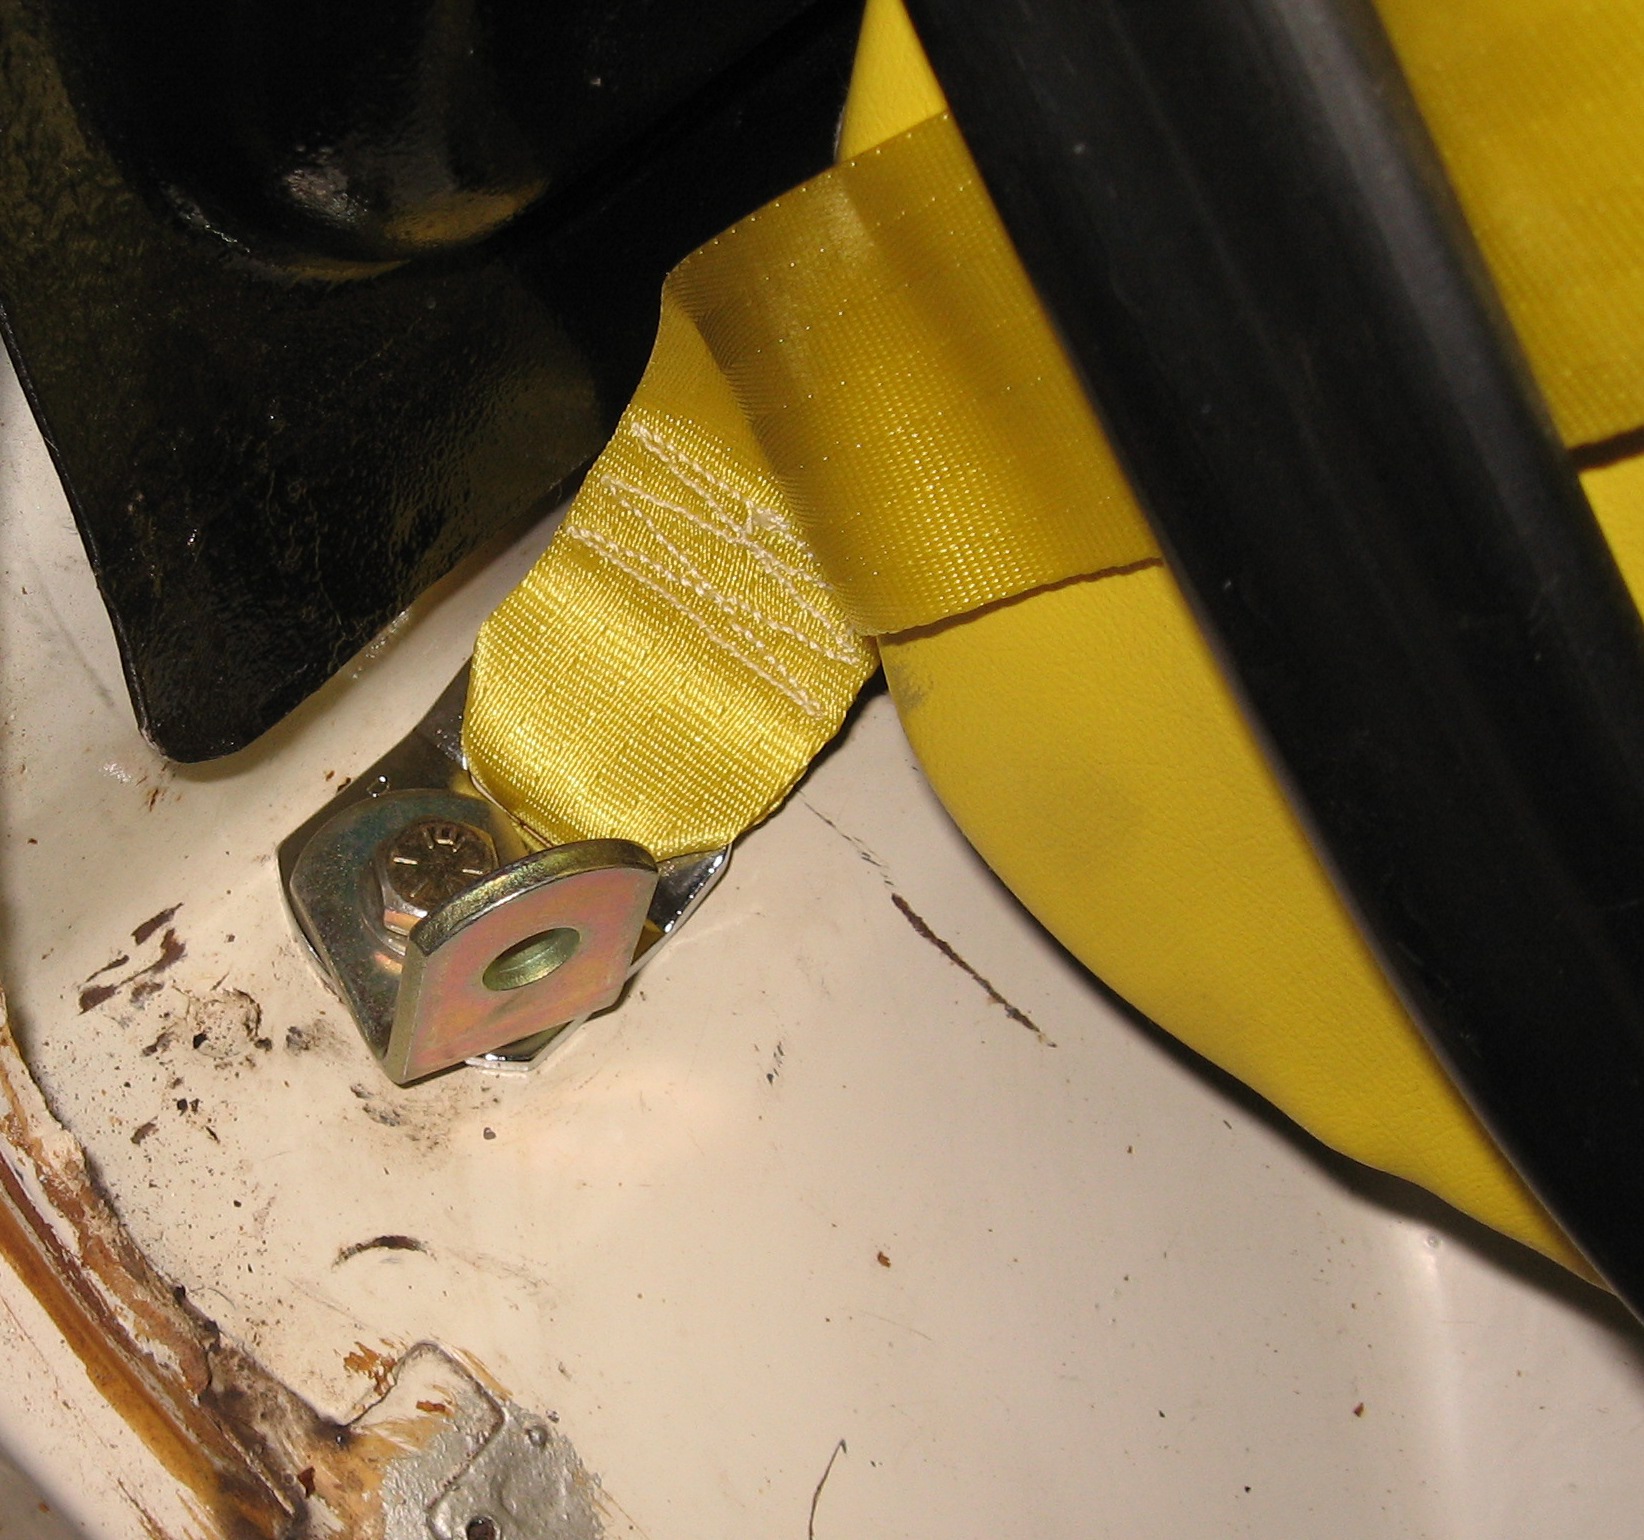
Here's the same lap belt anchor strategy being implemented on the RH side.

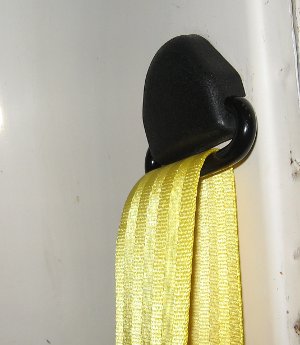
And here's the RH shoulder anchor cover.
These space alien claws came with the belts, and appear to slide over the webbing.

I'm guessing that they're meant to prevent excess webbing from being retracted in to the mechanism, but I may be missing some basic intended function! Does anybody happen to know what these are useful for?
Thanks very much for all the excellent guidance!!!
Robroy
I fiddled around with the belt anchor arrangement and managed to find a configuration with fewer snarls (left). And here's how the routing looks now (right and bottom).

Based on 70_F100's excellent advice, I added another hardened washer to the shoulder anchor bolt head (left). I then torqued it to 25 ft/lbs and snapped the cover on (right).


Here's the same lap belt anchor strategy being implemented on the RH side.

And here's the RH shoulder anchor cover.
These space alien claws came with the belts, and appear to slide over the webbing.
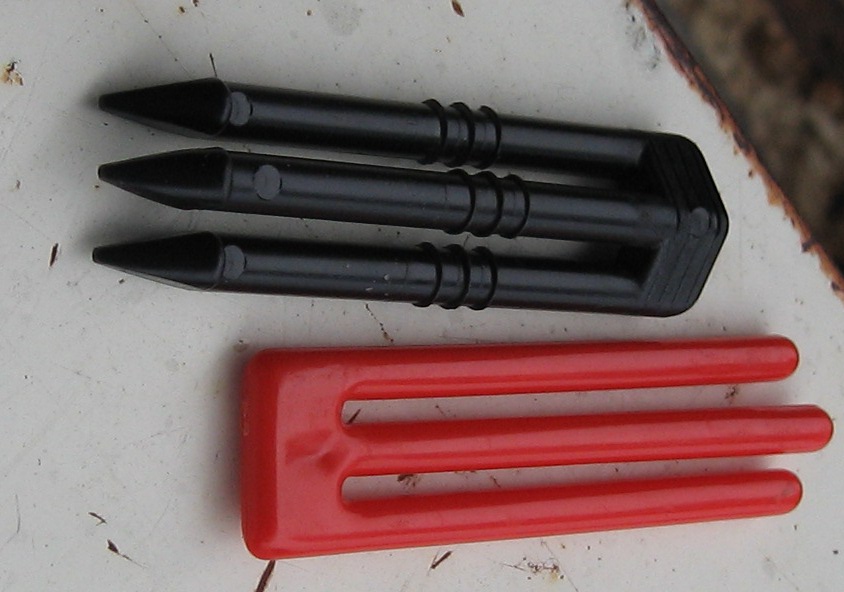
I'm guessing that they're meant to prevent excess webbing from being retracted in to the mechanism, but I may be missing some basic intended function! Does anybody happen to know what these are useful for?
Thanks very much for all the excellent guidance!!!
Robroy
-
1971ford

- 100% FORDified!
- Posts: 5565
- Joined: Wed Jul 04, 2007 1:05 pm
- Location: Placerville CA
Re: May I ask for advice on Beam's 140" WSCH300 seat belts?
PERFECT! I have the exact belt setup and drug it out yesterday and started looking at it. I am isntalling them before friday... This thread will help a lot.
Nice thread Robroy
Nice thread Robroy
-Ryan
-
robroy
- 100% FORDified!
- Posts: 3768
- Joined: Sun Jul 06, 2008 4:36 pm
- Location: California, Salinas
Re: May I ask for advice on Beam's 140" WSCH300 seat belts?
Good afternoon Ryan, thanks for replying!
It's good to hear that you're putting in some quality belts, and thanks for appreciating the thread!
Robroy
It's good to hear that you're putting in some quality belts, and thanks for appreciating the thread!
Robroy
-
mybros71

- Preferred User

- Posts: 290
- Joined: Tue Jan 27, 2009 11:00 pm
Re: May I ask for advice on Beam's 140" WSCH300 seat belts?
I've been following your post because I'm also going to be putting these belts in my daughter's truck. I'm a little concerned with the addition of the spacer in your shoulder anchor. It seems to me that you've already weakened it by removing material from the anchor point to enlarge the hole. I believe this loss is minimal, but present. Adding the spacer adds a fair amount of leverage to the bolt. I think this is acceptable because the bolt you are using is strong enough to resist streaching or shearing at the energies generated in a automobile collision. The part I'm concerned with is that you could sucessfully cut the spacer material with a light tubing cutter. If the spacer material is soft enough to cut using that cutter, it might also be soft enough that it will deflect in a collision, allow the bolt to bend or distort, and fail the anchor.
Maybe I am under-estimating your tenacity when it comes to cutting the spacer, but I would maybe look for a harder material to use.
Great pictures and documentation. Tony
Maybe I am under-estimating your tenacity when it comes to cutting the spacer, but I would maybe look for a harder material to use.
Great pictures and documentation. Tony
2006 Mustang GT (Wife's)
1962 Comet Custom (Wife's)
1971 F100 2wd Prerunner Project (Daughter's)
1971 F250 4wd "The Beast" (Son's)
2007 Toyota Tundra 4wd. (Credit Union's)
Seriously, the best truck I've ever owned, without exception.
1962 Comet Custom (Wife's)
1971 F100 2wd Prerunner Project (Daughter's)
1971 F250 4wd "The Beast" (Son's)
2007 Toyota Tundra 4wd. (Credit Union's)
Seriously, the best truck I've ever owned, without exception.
-
sport71

- Blue Oval Fan

- Posts: 560
- Joined: Sun Oct 02, 2005 6:17 pm
- Location: Texas, Mission
Re: May I ask for advice on Beam's 140" WSCH300 seat belts?
That's agreat job you did on the instalation of those seat belts. I'd feel safe with those.
Those who do not learn the lessons of history, are doomed to repeat it.